Entry Create
The EntryCreateCL class is responsible for managing the CREATE (POST) operation through the OData V2 model. This class eliminates the need for developers to concern themselves with fragments, user input validations, and value help creation when working on custom SAPUI5 applications or Fiori Elements extensions. The following section outlines the key features of the Entry Create class.
Features
- sap.m.Dialog generation with a SmartForm, SimpleForm, or custom content
- sap.uxap.ObjectPageLayout generation with a SmartForm, SimpleForm, or custom content
- User input validation via the ValidationLogicCL class
- Value Help Dialog generation via the ValueHelpCL class
- Property sorting, readonly properties, UUID generation for the properties with
Edm.Guidtype - Label generation for the SmartForm, SimpleForm elements
- createEntry(), submitChanges(), and resetChanges() handling based on the user interaction
- Call a fragment and bind the context in case you do not want to use the auto-generated dialog
Info
While the examples of the features on this page are based on the Entry Create class, the majority of the features are also available in the Entry Update, Entry Delete, and Entry Read classes.
Use Case
Let's assume you have an EntitySet named Products and wish to provide your end-user with the capability to create a new entity via a pop-up screen using the OData V2 service in your custom SAPUI5 application. The following steps are required to achieve this functionality.
1) It is necessary to create a .fragment.xml file that contains a dialog with form content (Simple, Smart, etc.) and to call it from the controller or to generate the dialog directly on the controller.
2) If you do not use the sap.ui.comp.smartfield.SmartField component with the OData Annotations, you will need to write a significant amount of Value Help code.
3) It is essential to validate user input, such as checking mandatory fields and ensuring that the values entered align with your business logic.
4) It is necessary to create a transient entity (createEntry) and either submit it or reset it based on the user interaction.
The EntryCreateCL class is responsible for executing all of the steps mentioned above.
Constructor
In order to utilise the functionality of EntryCreateCL, it is necessary to initialise the object.
| Parameter | Type | Mandatory | Default Value | Description |
|---|---|---|---|---|
| controller | sap.ui.core.mvc.Controller | Yes | The controller object (usually this object) |
|
| entityPath | string |
Yes | The name of the EntitySet. It can start with a "/" (slash) | |
| modelName? | string |
No | undefined |
The name of the OData V2 model which can be found on the manifest.json file. Leave this parameter undefined if the name of the OData model = "" (empty string) |
Tip for TypeScript
The EntryCreateCL<EntityT> class is a generic class that can be initialized with a type that contains the properties of the EntitySet used as a parameter on the class constructor. The EntityT type is used as the data? parameter type for the createNewEntry(data?: EntityT) method.
Additionally, it is utilized as the return type of the getResponse(): EntityT method of the ResponseCL class, whose object is passed as a parameter into the function attached by the attachSubmitCompleted(submitCompleted: (response: ResponseCL<EntityT>) => void, listener?: object) method.
1 2 3 4 5 6 7 8 9 10 11 12 13 14 15 16 17 18 19 20 21 22 23 24 25 26 27 28 29 30 31 | |
1 2 3 4 5 6 7 8 9 10 11 12 13 14 15 16 17 18 19 20 21 22 23 24 25 26 27 | |
Create New Entry
The createNewEntry(data?: EntityT) method creates an entry for the EntitySet specified through the class constructor and binds it to the automatically generated or loaded dialog, which is located in the application files. The createEntry() method from the SAPUI5 library is utilized to create an entry, and the dialog is then opened after the entry is created.
The createNewEntry() method utilizes the ODataMetaModel to determine the EntityType of the EntitySet designated through the constructor. It then generates the form with the properties in the same order as the OData metadata, in accordance with the EntityType.
Note
Please note that all key properties are marked as mandatory/required, and the labels are generated assuming that the naming convention of the EntityType is camelCase. For further details, please see the Label Generation section.
Warning
Please be advised that the createNewEntry() method must be called after any configurations have been made through the public methods of the Entry Create class. Any configurations (form title, mandatory properties, etc.) made after the createNewEntry() method will not be reflected. As a best practice, the createNewEntry() method should be called at the end of your code block.
Note
The default setting for key properties with the Edm.Guid type is to generate a random UUID value, which is not visible on the generated form. However, this behavior can be modified using the setGenerateRandomGuid() and setDisplayGuidProperties() methods.
Method Parameters
| Parameter | Type | Mandatory | Default Value | Description |
|---|---|---|---|---|
| data? | EntityT or object |
No | undefined |
The initial values of the entry |
| Returns | Description |
|---|---|
Promise<void> |
Once the promise has been fulfilled, the newly created entry can be retrieved using the getEntryContext() method with the object instantiated from the EntryCreateCL class. |
Info
The createNewEntry() method utilizes the default configurations when creating the dialog. However, these configurations can be modified through the use of the public setter methods.
Default Values
| Term | Default Value | Description | Setter | Getter |
|---|---|---|---|---|
| Naming Strategy | NamingStrategies.CAMEL_CASE | The default naming strategy is CAMEL_CASE | setNamingStrategy() | getNamingStrategy() |
| Resource Bundle Prefix | antares |
The default resource bundle prefix is antares | setResourceBundlePrefix() | getResourceBundlePrefix() |
| Use Metadata Labels | false |
The labels are not derived from the metadata, but rather generated. | setUseMetadataLabels() | getUseMetadataLabels() |
| Form Type | FormTypes.SMART | The SmartForm with SmartFields is generated as the default option. | setFormType() | getFormType() |
| Form Title | Create New + ${entityPath} |
The entityPath parameter of the constructor is used |
setFormTitle() | getFormTitle() |
| Begin Button Text | Create |
The default begin button text is Create | setBeginButtonText() | getBeginButtonText() |
| Begin Button Type | ButtonType.Success | The default button type is Success | setBeginButtonType() | getBeginButtonType() |
| End Button Text | Close |
The default end button text is Close | setEndButtonText() | getEndButtonText() |
| End Button Type | ButtonType.Negative | The default button type is Negative | setEndButtonType() | getEndButtonType() |
| Mandatory Error Message | Please fill in all required fields. |
The displayed message when the mandatory check is unsuccessful | setMandatoryErrorMessage() | getMandatoryErrorMessage() |
Example
Let's assume you have an EntitySet named Products and wish to provide your end-user with the capability to create a new entity via a pop-up screen using the OData V2 service in your custom SAPUI5 application.
1 2 3 4 5 6 7 8 9 10 11 12 13 14 15 16 17 18 19 20 21 22 23 24 25 26 27 28 29 30 31 32 33 34 35 | |
1 2 3 4 5 6 7 8 9 10 11 12 13 14 15 16 17 18 19 20 21 22 23 24 25 26 27 28 29 30 31 32 33 34 35 36 | |
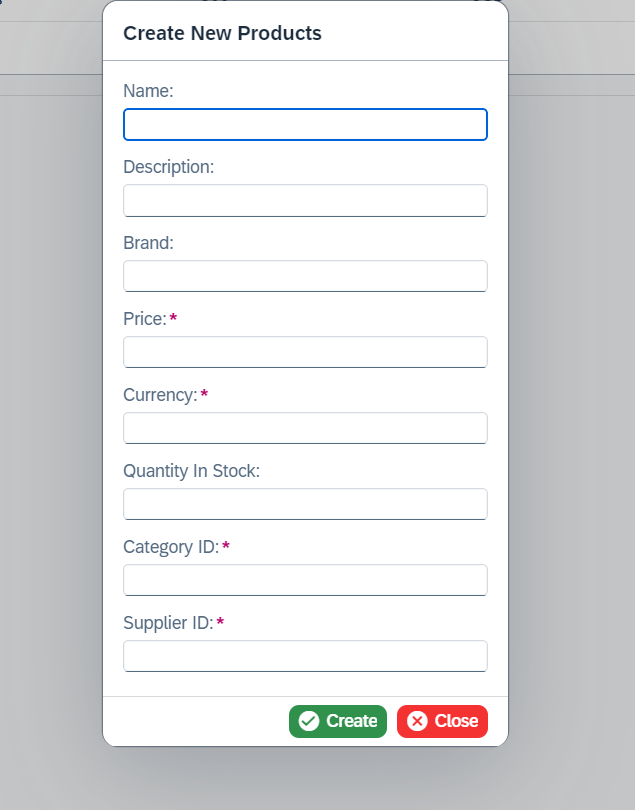
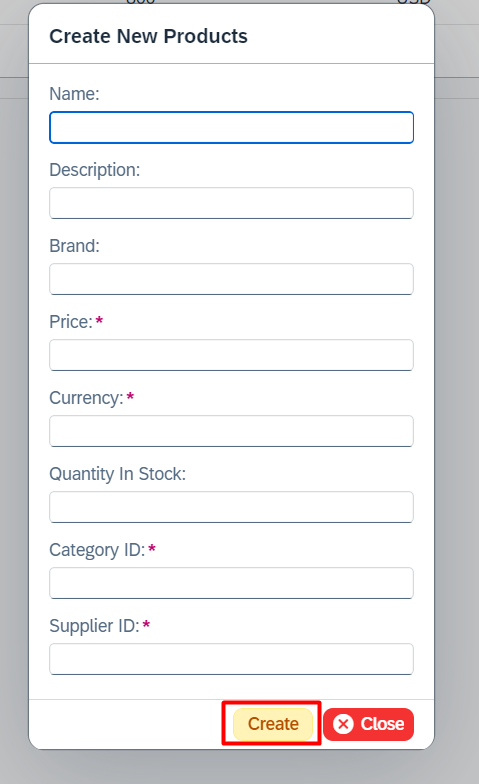
The generated form with default values will be similar in appearance to the following example. However, it should be noted that the exact appearance may vary depending on the configurations and the EntityType properties of the EntitySet.
Manual Submit
As a default setting, any changes made by the end user on the auto-generated form will be automatically submitted by the Entry Create and Entry Update classes upon pressing the begin button. There may be a necessity, however, to run some code prior to submitting the changes via the OData V2 model.
It is possible to register a function that will be called in replacement of the automatic submit mechanism when the end user presses the begin button.
Attention
- Please be advised that the manual submit feature is only available for the Entry Create and Entry Update classes.
- Please be advised that this feature cannot be used in conjunction with the Object Page feature.
To register a function, the registerManualSubmit() method can be used. Upon pressing the begin button, the registered function will be called, and an object constructed from the Entry Create or Entry Update class will be passed as a parameter to the function.
Once you have run your own code in the registered function, please call the submitManually() method using the object passed as a parameter to the function in order to complete the process.
Furthermore, the auto-generated dialog (sap.m.Dialog) can be obtained by calling the getGeneratedDialog() method with the object passed as a parameter to the function.
| Parameter | Type | Mandatory | Description |
|---|---|---|---|
| submitter | (entry: EntryCreateCL<EntityT> | EntryUpdateCL<EntityT>) => void |
Yes | The function that will be called when the user presses the begin button |
| Returns | Description |
|---|---|
| sap.m.Dialog | Returns the auto-generated dialog |
Example
Let us consider an EntitySet named Products. Before submitting the changes through the OData V2 model, we would like to run some code.
1 2 3 4 5 6 7 8 9 10 11 12 13 14 15 16 17 18 19 20 21 22 23 24 25 26 27 28 29 30 31 32 33 34 35 36 37 38 39 40 41 42 43 44 45 46 47 48 49 50 51 52 53 54 55 56 57 58 59 60 61 62 63 64 65 66 67 68 69 70 71 72 73 74 75 76 77 78 79 80 81 82 83 84 | |
1 2 3 4 5 6 7 8 9 10 11 12 13 14 15 16 17 18 19 20 21 22 23 24 25 26 27 28 29 30 31 32 33 34 35 36 37 38 39 40 41 42 43 44 45 46 47 48 49 50 51 52 53 54 55 56 57 58 59 60 61 62 63 64 65 66 67 68 69 70 71 72 | |
Disable Auto Dialog Close
The generated dialog is closed and destroyed after the submission is completed by default in the Entry Create and Entry Update classes. However, this auto-close feature can be disabled if you still need to access the dialog content after the submission. This feature is particularly useful when there are custom contents that will be managed after the submission is completed.
Tip
To close and destroy the dialog afterwards, the closeAndDestroyEntryDialog() method can be utilized through the object instantiated from the Entry Create or Entry Update class.
To disable the auto close feature, the setDisableAutoClose() method can be utilized.
| Parameter | Type | Mandatory | Description |
|---|---|---|---|
| disable | boolean |
Yes | When this parameter is set to true, the auto close feature will be disabled |
| Returns | Description |
|---|---|
boolean |
Returns the value that was set using setDisableAutoClose() method. Default value is false |
Example
1 2 3 4 5 6 7 8 9 10 11 12 13 14 15 16 17 18 19 20 21 22 23 24 25 26 27 28 29 30 31 32 33 34 35 36 37 38 39 40 41 42 43 44 45 46 47 48 49 50 51 52 | |
1 2 3 4 5 6 7 8 9 10 11 12 13 14 15 16 17 18 19 20 21 22 23 24 25 26 27 28 29 30 31 32 33 34 35 36 37 38 39 | |
Label Generation
The Entry Create class is designed to generate labels for form elements within the auto-generated SmartForm/SimpleForm, as the default setting. The following steps will be followed during the creation of the labels.
Note
In the event that the metadata labels are not utilized when creating the labels, the Resource Model will take precedence.
Resource Model (i18n)
In the event that the application in question has a Resource Model named i18n within its manifest.json file, the Entry Create class will search for the texts associated with each property of the EntityType, operating under the assumption that the key of the i18n text is written in the format outlined below.
Info
Default format of the i18n keys: antares + entityPath + propertyName
In this context, antares is the default prefix, which can be modified using the setResourceBundlePrefix() method. The entityPath is derived from the class constructor, while the propertyName represents the technical name of an EntityType property in the OData V2 metadata.
{
  "_version": "1.59.0",
  "sap.app": {
    ...
    "i18n": "path/to/i18n.properties"
  },
  ...
  "sap.ui5": {
    ...
    "models": {
      "i18n": {
          "type": "sap.ui.model.resource.ResourceModel",
          "settings": {
              "bundleName": "your.apps.namespace.i18n.i18n"
          }
      }
    }
  }
}
Example
If you have an EntitySet named Products with the properties shown in the metadata below, your application's i18n.properties file will be checked for the following keys.
antaresProductsID=Label of the ID property
antaresProductsname=Label of the name property
antaresProductsdescription=Label of the description property
...
<?xml version="1.0" encoding="utf-8"?>
<edmx:Edmx Version="1.0" xmlns:edmx="http://schemas.microsoft.com/ado/2007/06/edmx" xmlns:m="http://schemas.microsoft.com/ado/2007/08/dataservices/metadata">
    <edmx:DataServices m:DataServiceVersion="2.0">
        <Schema Namespace="OnlineShopping" xmlns="http://schemas.microsoft.com/ado/2008/09/edm">
            <EntityContainer Name="EntityContainer" m:IsDefaultEntityContainer="true">
                <EntitySet Name="Products" EntityType="OnlineShopping.Product"/>
            </EntityContainer>
            <EntityType Name="Product">
                <Key>
                    <PropertyRef Name="ID"/>
                </Key>
                <Property Name="ID" Type="Edm.Guid" Nullable="false"/>
                <Property Name="name" Type="Edm.String" MaxLength="50"/>
                <Property Name="description" Type="Edm.String" MaxLength="255"/>
                <Property Name="brand" Type="Edm.String" MaxLength="50"/>
                <Property Name="price" Type="Edm.Decimal" Precision="13" Scale="2" Nullable="false"/>
                <Property Name="currency" Type="Edm.String" MaxLength="5" Nullable="false"/>
                <Property Name="quantityInStock" Type="Edm.Int32"/>
                <Property Name="categoryID" Type="Edm.Guid" Nullable="false"/>
                <Property Name="supplierID" Type="Edm.Guid" Nullable="false"/>
            </EntityType>
        </Schema>
    </edmx:DataServices>
</edmx:Edmx>
Info
In the event that the Resource Model is unavailable or the text is not present in the i18n.properties file, the Label Generation From The Technical Names process will be initiated.
Label Generation From The Technical Names
In the event that a label cannot be generated from the Resource Model, the Entry Create class attempts to parse the technical property names of the EntityType into human-readable words.
The default assumption is that the naming convention for EntityType properties is camelCase. However, if a different naming convention was used when creating these properties, setNamingStrategy() can be used to change the default naming convention.
Example
The following examples illustrate the breakdown of property names into human-readable words in various naming strategies.
| Technical Name | Generated Label |
|---|---|
| productID | Product ID |
| firstName | First Name |
| lastName | Last Name |
Note: Uid, Id and Url words are accepted as special words and converted to upper case after splitting.
| Technical Name | Generated Label |
|---|---|
| ProductId | Product ID |
| FirstName | First Name |
| LastName | Last Name |
| Technical Name | Generated Label |
|---|---|
| product-id | Product Id |
| first-name | First Name |
| last-name | Last Name |
| Technical Name | Generated Label |
|---|---|
| PRODUCT_ID | Product Id |
| FIRST_NAME | First Name |
| LAST_NAME | Last Name |
| Technical Name | Generated Label |
|---|---|
| product_id | Product Id |
| first_name | First Name |
| last_name | Last Name |
Use Metadata Labels
If you have a com.sap.vocabularies.Common.v1.Label annotation or a sap:label extension for your EntityType properties in the OData V2 metadata, you can utilize them as labels for the auto-generated form elements.
Warning
If the value is set to true using the setter method and the labels are not found in the metadata, the Entry Create class will generate the labels in accordance with the instructions set out in the Label Generation section.
| Parameter | Type | Mandatory | Description |
|---|---|---|---|
| useMetadataLabels | boolean |
Yes | If the value is true, the OData V2 metadata labels will be used when creating labels for the auto-generated form elements |
| Returns | Description |
|---|---|
boolean |
Returns the value that was set using setUseMetadataLabels() method. Default value is false |
Example
1 2 3 4 5 6 7 8 9 10 11 12 13 14 15 16 17 18 19 20 | |
1 2 3 4 5 6 7 8 9 10 11 12 13 14 15 16 17 18 19 20 21 22 23 24 25 26 | |
Resource Bundle Prefix
To modify the default resource bundle prefix utilized in the text lookup process outlined in the Resource Model (i18n), the setResourceBundlePrefix() method can be utilized.
Tip
If you do not wish to utilize a prefix, it is recommended that you pass an empty string, represented by "", as a parameter to the setResourceBundlePrefix() method.
| Parameter | Type | Mandatory | Description |
|---|---|---|---|
| prefix | string |
Yes | The prefix that is used for text lookup in the i18n file of the application |
| Returns | Description |
|---|---|
string |
Returns the value that was set using setResourceBundlePrefix() method. Default value is antares |
Example
Let us assume that you have created an EntitySet named Products, which contains the following properties: productID and productName. If you have set the resource bundle prefix to myPrefix, the Entry Create class will search for the following texts in the application's i18n file:
myPrefixProductsproductID=Label of the productID property
myPrefixProductsproductName=Label of the productName property
1 2 3 4 5 6 7 8 9 10 11 12 13 14 15 16 17 18 19 20 21 22 23 24 25 26 27 28 29 | |
1 2 3 4 5 6 7 8 9 10 11 12 13 14 15 16 17 18 19 20 21 22 23 24 25 26 27 28 29 30 31 32 33 34 35 | |
Naming Strategy
To modify the default naming strategy employed during label generation, as outlined in the Label Generation From The Technical Names documentation, the setNamingStrategy() method can be utilized.
| Parameter | Type | Mandatory | Description |
|---|---|---|---|
| strategy | NamingStrategies | Yes | The naming strategy that is used for label generation |
| Returns | Description |
|---|---|
| NamingStrategies | Returns the value that was set using setNamingStrategy() method. Default value is CAMEL_CASE |
Example
Let us consider the following scenario: You have an EntitySet named Products with the properties product_id and product_name. You have opted not to utilize the labels from the metadata or the i18n file. Instead, you would like the library to generate the labels. To achieve this, you can set the naming strategy as follows:
1 2 3 4 5 6 7 8 9 10 11 12 13 14 15 16 17 18 19 20 21 | |
1 2 3 4 5 6 7 8 9 10 11 12 13 14 15 16 17 18 19 20 21 22 23 24 25 26 27 28 29 30 | |
NamingStrategies Enum
| Name | Description |
|---|---|
| NamingStrategies.CAMEL_CASE | EntityType properties use camelCase naming convention |
| NamingStrategies.PASCAL_CASE | EntityType properties use PascalCase naming convention |
| NamingStrategies.KEBAB_CASE | EntityType properties use kebab-case naming convention |
| NamingStrategies.CONSTANT_CASE | EntityType properties use CONSTANT_CASE naming convention |
| NamingStrategies.SNAKE_CASE | EntityType properties use snake_case naming convention |
Form Type
The createNewEntry() method automatically generates a sap.ui.comp.smartform.SmartForm with sap.ui.comp.smartfield.SmartField content. This form type offers several advantages.
1) The form fields are rendered as Input, DatePicker, DateTimePicker, ComboBox, CheckBox, and so on, based on the EDM type of the EntityType property.
2) When the EntityType property is annotated with com.sap.vocabularies.Common.v1.ValueList, the Value Help List is automatically added to the smart fields.
The UI5 Antares is capable of creating a sap.ui.layout.form.SimpleForm with sap.m.Input, sap.m.DatePicker, sap.m.DateTimePicker, and sap.m.CheckBox content based on the EDM types.
Attention
The Value Help class is only available when the form type is set to SIMPLE.
Rendered Controls for SIMPLE Form Type
| EDM Type | Control | Description |
|---|---|---|
Boolean |
sap.m.CheckBox | |
DateTime |
sap.m.DatePicker or sap.m.DateTimePicker | If the property has sap:display-format="Date" extension, it is rendered as sap.m.DatePicker, otherwise as sap.m.DateTimePicker |
DateTimeOffset |
sap.m.DateTimePicker | |
Others |
sap.m.Input | If the EDM type of the property is Edm.Decimal, precision and scale constraints are added into the input |
To modify the default form type, the setFormType() method can be utilized.
Example
If you have an EntitySet named Products and wish to create a simple form within the dialog, you can set the form type as follows.
1 2 3 4 5 6 7 8 9 10 11 12 13 14 15 16 17 18 19 20 21 | |
1 2 3 4 5 6 7 8 9 10 11 12 13 14 15 16 17 18 19 20 21 22 23 24 25 26 27 28 29 30 | |
FormTypes Enum
| Name | Description |
|---|---|
| FormTypes.SMART | SmartForm with SmartField content is generated |
| FormTypes.SIMPLE | SimpleForm with Input, DatePicker, DateTimePicker, CheckBox content is generated |
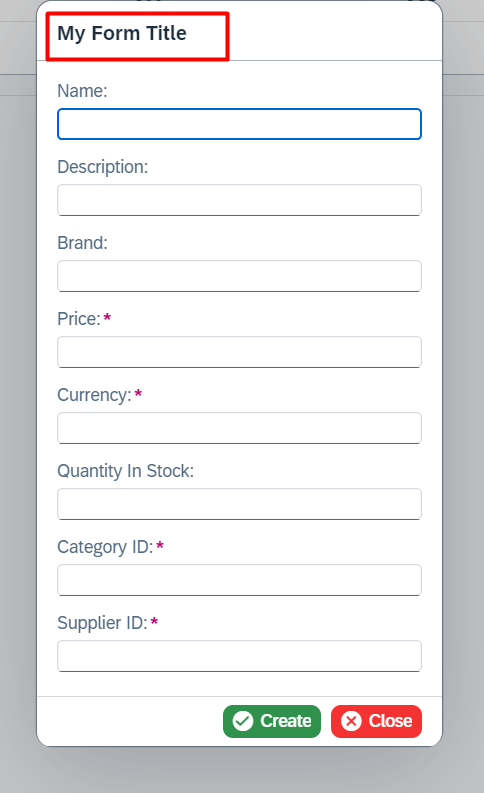
Form Title
The generated form's title is automatically generated by combining the words Create New with the entityPath defined in the constructor. For example, if the entityPath is set to Products, the title will be Create New Products.
To modify the default form title, please utilize the setFormTitle() method.
| Parameter | Type | Mandatory | Description |
|---|---|---|---|
| title | string |
Yes | The generated form's title |
| Returns | Description |
|---|---|
string |
Returns the value that was set using setFormTitle() method. Default value is Create new ${entityPath} |
Example
Please refer to the result below, which can be found after the code blocks.
1 2 3 4 5 6 7 8 9 10 11 12 13 14 15 16 17 18 19 20 | |
1 2 3 4 5 6 7 8 9 10 11 12 13 14 15 16 17 18 19 20 21 22 23 24 25 26 | |
Form Grouping
By default, all the properties of an EntitySet are placed in a single group or section in the auto-generated dialog or object page, with the title for that group hidden (visible on the object page). It is possible to categorize the properties into different groups in the auto-generated form, should you wish to do so.
Info
Upon activation of the Object Page feature, the form grouping feature generates sections on the object page.
To create the form groups or object page sections, setFormGroups() method can be utilized.
Info
-
All of the key properties of the
EntitySetare placed into a default group, and this behavior is not open to modification. The title of this group can be modified using the setDefaultGroupTitle() method. If the setDefaultGroupTitle() method is not used, the default group title will remain hidden in the auto-generated dialog. However, it will always be visible in the auto-generated object page, and the title will be derived from the Form Title feature for the object page. -
Any properties not included in the setFormGroups() method or the default group are placed in a group designated as the Unknown Group. To disable this group, set the second parameter of the setFormGroups() method to false. This configuration allows only the key properties and the other properties specified in the setFormGroups() method to be visible in the auto-generated dialog or auto-generated object page.
-
Should you wish to retain the Unknown Group but modify the group title, you may utilize the setUnknownGroupTitle() method.
| Parameter | Type | Mandatory | Description |
|---|---|---|---|
| groups | IFormGroups[] | Yes | The form groups or sections displayed in the auto-generated dialog or object page |
| includeAllProperties? | boolean |
No | If set to false all the other non-key properties will not be included. Default is true |
| Returns | Description |
|---|---|
| IFormGroups[] | Returns the groups that were set using setFormGroups() method. Default value is [] |
| Parameter | Type | Mandatory | Description |
|---|---|---|---|
| title | string |
Yes | The title of the default group or section that is generated for the key properties |
| Returns | Description |
|---|---|
string |
Returns the title that was set using setDefaultGroupTitle() method. Default value is undefined for the dialog. However, it is derived from the Form Title for the object page |
| Parameter | Type | Mandatory | Description |
|---|---|---|---|
| title | string |
Yes | The title of the unknown group or section that is generated for the other properties |
| Returns | Description |
|---|---|
string |
Returns the title that was set using setUnknownGroupTitle() method. Default value is Unknown Group |
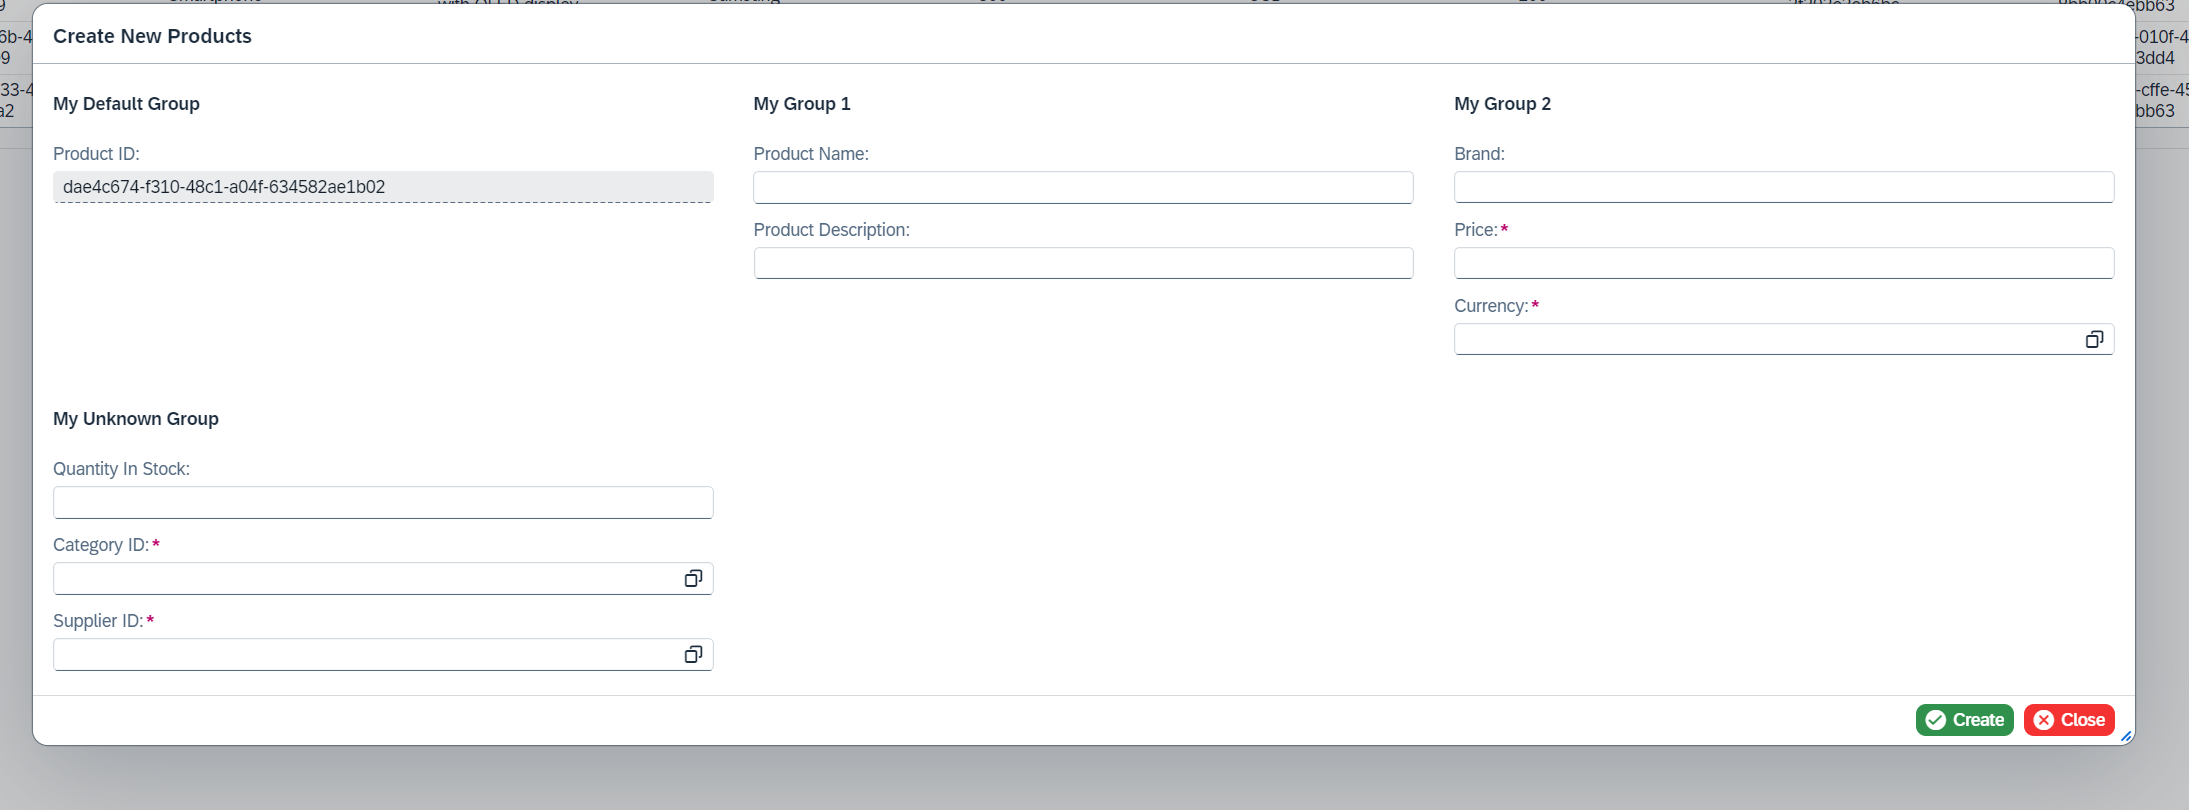
Example
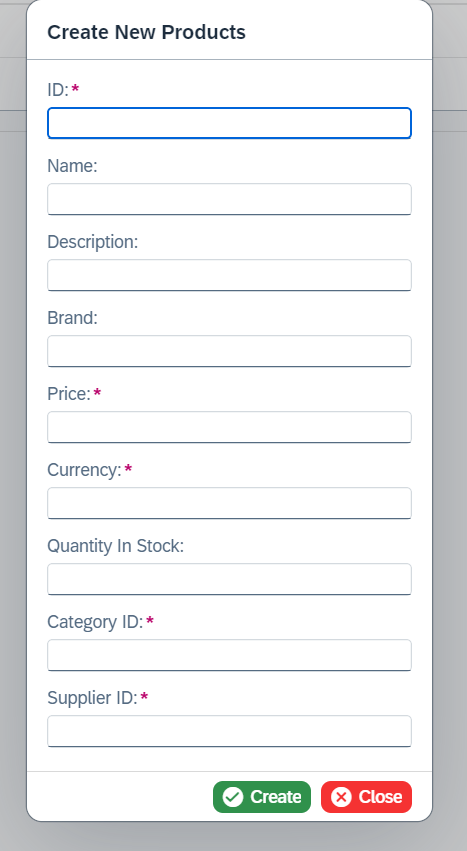
Let us consider an EntitySet named Products and the objective is to categorize the properties into different groups in the auto-generated form. Please see the results below after the code blocks for reference.
1 2 3 4 5 6 7 8 9 10 11 12 13 14 15 16 17 18 19 20 21 22 23 24 25 26 27 28 29 30 31 32 33 34 35 36 37 38 39 40 41 42 43 44 45 46 47 | |
1 2 3 4 5 6 7 8 9 10 11 12 13 14 15 16 17 18 19 20 21 22 23 24 25 26 27 28 29 30 31 32 33 34 35 36 37 38 39 40 41 | |
IFormGroups Type Definition
| Property | Type | Description |
|---|---|---|
| IFormGroups | object |
|
| title | string |
The title of the form group or object page section |
| properties | string[] |
The properties that will be included into the group |
Custom Data
The UI5 Antares enables users to add Custom Data to the auto-generated SIMPLE/SMART form elements. To add custom data, simply use the setFieldCustomData() method.
| Parameter | Type | Mandatory | Description |
|---|---|---|---|
| customData | IFieldCustomData[] | Yes | The custom data that will be added to the auto-generated form elements |
| Returns | Description |
|---|---|
| IFieldCustomData[] | Returns the value that was set using setFieldCustomData() method. Default value is [] |
Example
1 2 3 4 5 6 7 8 9 10 11 12 13 14 15 16 17 18 19 20 21 22 23 24 25 26 27 28 29 30 31 32 33 34 35 36 37 38 39 40 41 42 | |
1 2 3 4 5 6 7 8 9 10 11 12 13 14 15 16 17 18 19 20 21 22 23 24 25 26 27 28 29 30 31 32 33 34 35 36 | |
IFieldCustomData Type Definition
| Property | Type | Description |
|---|---|---|
| IFieldCustomData | object |
|
| propertyName | string |
The name of the property that will have the custom data |
| customData | Custom Data | The custom data |
Text In Edit Mode Source
The UI5 Antares allows users to set the textInEditModeSource property of the SmartField when a SmartForm is generated. To set the textInEditModeSource property, the setTextInEditModeSource() method can be utilized.
| Parameter | Type | Mandatory | Description |
|---|---|---|---|
| textInEditModeSource | ITextInEditModeSource[] | Yes | The textInEditModeSource configs for the properties |
| Returns | Description |
|---|---|
| ITextInEditModeSource[] | Returns the value that was set using setTextInEditModeSource() method. Default value is [] |
Example
1 2 3 4 5 6 7 8 9 10 11 12 13 14 15 16 17 18 19 20 21 22 23 24 25 26 27 28 29 30 31 32 33 34 35 36 37 38 39 40 41 42 | |
1 2 3 4 5 6 7 8 9 10 11 12 13 14 15 16 17 18 19 20 21 22 23 24 25 26 27 28 29 30 31 32 33 34 35 36 37 38 | |
ITextInEditModeSource Type Definition
| Property | Type | Description |
|---|---|---|
| ITextInEditModeSource | object |
|
| propertyName | string |
The name of the property whose textInEditModeSource property will be set |
| textInEditModeSource | TextInEditModeSource | The textInEditModeSource property of the smartfield |
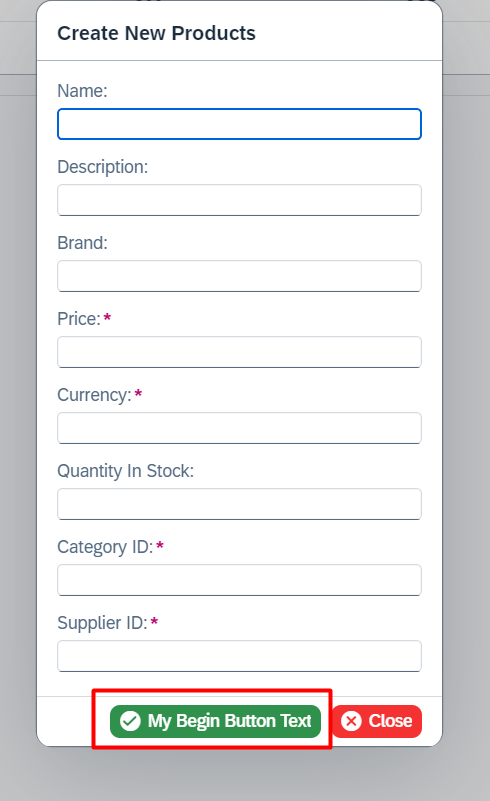
Begin Button Text
Upon clicking the Begin Button, the Entry Create class initiates the validation process and submits the transient entity through the OData V2 model. The default text displayed on the Begin button is Create. The text displayed on the Begin Button can be modified using the setBeginButtonText() method.
| Parameter | Type | Mandatory | Description |
|---|---|---|---|
| text | string |
Yes | The text displayed on the begin button |
| Returns | Description |
|---|---|
string |
Returns the value that was set using setBeginButtonText() method. Default value is Create |
Example
Please refer to the result below, which can be found after the code blocks.
1 2 3 4 5 6 7 8 9 10 11 12 13 14 15 16 17 18 19 20 | |
1 2 3 4 5 6 7 8 9 10 11 12 13 14 15 16 17 18 19 20 21 22 23 24 25 26 | |
Begin Button Type
The default type used on the Begin Button is ButtonType.Success. Should you wish to modify the default Begin Button type, please utilize the setBeginButtonType() method.
| Parameter | Type | Mandatory | Description |
|---|---|---|---|
| type | ButtonType | Yes | The type of the begin button |
| Returns | Description |
|---|---|
| ButtonType | Returns the value that was set using setBeginButtonType() method. Default value is Success |
Example
Please refer to the result below, which can be found after the code blocks.
1 2 3 4 5 6 7 8 9 10 11 12 13 14 15 16 17 18 19 20 21 | |
1 2 3 4 5 6 7 8 9 10 11 12 13 14 15 16 17 18 19 20 21 22 23 24 25 26 27 | |
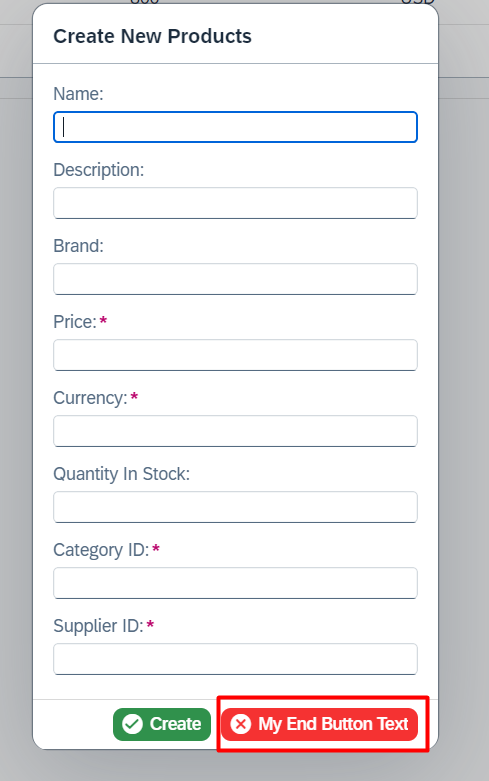
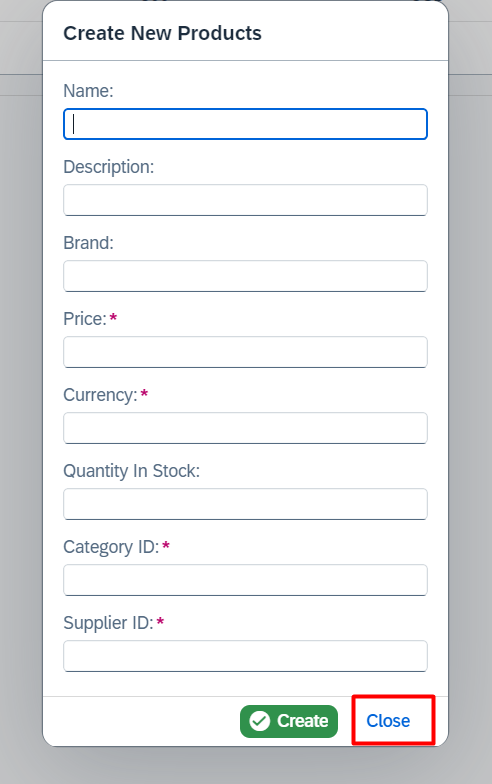
End Button Text
Once the end user clicks the End Button, the Entry Create class resets the transient entity through the OData V2 Model and destroys the created dialog. The default text displayed on the end button is Close. This text can be modified using the setEndButtonText() method.
| Parameter | Type | Mandatory | Description |
|---|---|---|---|
| text | string |
Yes | The text displayed on the end button |
| Returns | Description |
|---|---|
string |
Returns the value that was set using setEndButtonText() method. Default value is Close |
Example
Please refer to the result below, which can be found after the code blocks.
1 2 3 4 5 6 7 8 9 10 11 12 13 14 15 16 17 18 19 20 | |
1 2 3 4 5 6 7 8 9 10 11 12 13 14 15 16 17 18 19 20 21 22 23 24 25 26 | |
End Button Type
The default type used on the End Button is ButtonType.Negative. Should you wish to modify the default end button type, please utilize the setEndButtonType() method.
| Parameter | Type | Mandatory | Description |
|---|---|---|---|
| type | ButtonType | Yes | The type of the end button |
| Returns | Description |
|---|---|
| ButtonType | Returns the value that was set using setEndButtonType() method. Default value is Negative |
Example
Please refer to the result below, which can be found after the code blocks.
1 2 3 4 5 6 7 8 9 10 11 12 13 14 15 16 17 18 19 20 21 | |
1 2 3 4 5 6 7 8 9 10 11 12 13 14 15 16 17 18 19 20 21 22 23 24 25 26 27 | |
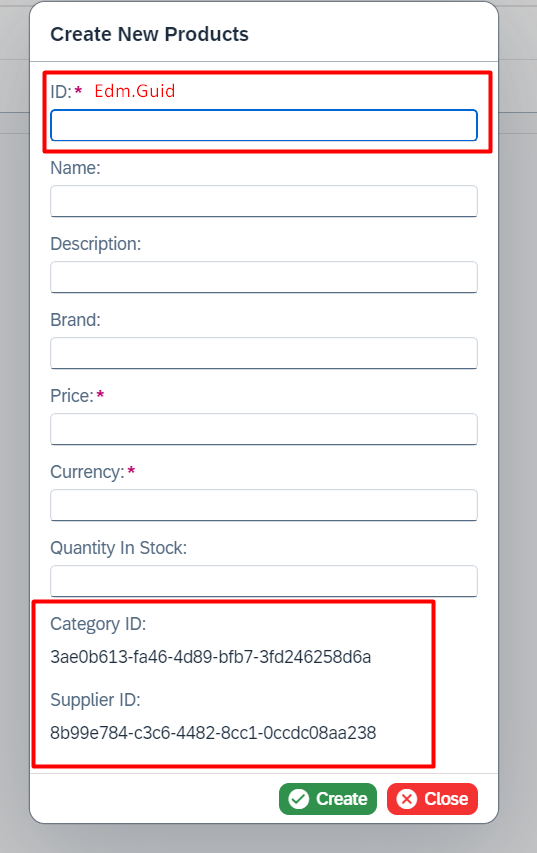
Properties with Edm.Guid Type
The Entry Create class automatically generates unique, randomly generated UUID values for the key properties (with Edm.Guid type) of the EntityType, which are then hidden from view on the form for the end user.
Should you wish to modify the default random UUID generation behavior, please utilize the setGenerateRandomGuid() method.
| Parameter | Type | Mandatory | Description |
|---|---|---|---|
| strategy | GuidStrategies | Yes | The random UUID generation strategy |
| Returns | Description |
|---|---|
| GuidStrategies | Returns the value that was set using setGenerateRandomGuid() method. Default value is ONLY_KEY |
To modify the default visibility behavior of the properties with Edm.Guid type, please utilize the setDisplayGuidProperties() method.
| Parameter | Type | Mandatory | Description |
|---|---|---|---|
| strategy | GuidStrategies | Yes | The visibility strategy for the properties with Edm.Guid type |
| Returns | Description |
|---|---|
| GuidStrategies | Returns the value that was set using setDisplayGuidProperties() method. Default value is ONLY_NON_KEY |
Example
Let us consider the following scenario: You have an EntitySet named Products with ID, categoryID, and supplierID, all of which have the Edm.Guid type. You would like to allow the end user to view all Edm.Guid properties and have the library generate random UUID values only for the non-key properties.
1 2 3 4 5 6 7 8 9 10 11 12 13 14 15 16 17 18 19 20 21 22 23 24 | |
1 2 3 4 5 6 7 8 9 10 11 12 13 14 15 16 17 18 19 20 21 22 23 24 25 26 27 28 29 30 31 32 33 | |
GuidStrategies Enum
Info
Please note that if a random UUID is generated for a property and marked as visible, this field cannot be edited by the end user.
| Name | Description |
|---|---|
| GuidStrategies.ALL | Generate random UUID values for all the properties with Edm.Guid type |
| GuidStrategies.ONLY_KEY | Generate random UUID values only for the key properties with Edm.Guid type |
| GuidStrategies.ONLY_NON_KEY | Generate random UUID values only for the properties that are not key and have Edm.Guid type |
| GuidStrategies.NONE | No random UUID generation |
| Name | Description |
|---|---|
| GuidStrategies.ALL | The end user can display all the properties with Edm.Guid type |
| GuidStrategies.ONLY_KEY | The end user can display only the key properties with Edm.Guid type |
| GuidStrategies.ONLY_NON_KEY | The end user can display only the properties that are not key and have Edm.Guid type |
| GuidStrategies.NONE | No property with Edm.Guid is visible to the end user |
Form Property Order
The auto-generated form elements are displayed in accordance with the order set forth in the OData V2 metadata.
Note
Please be advised that the key properties always come first on the auto-generated form. This behavior is not open to modification.
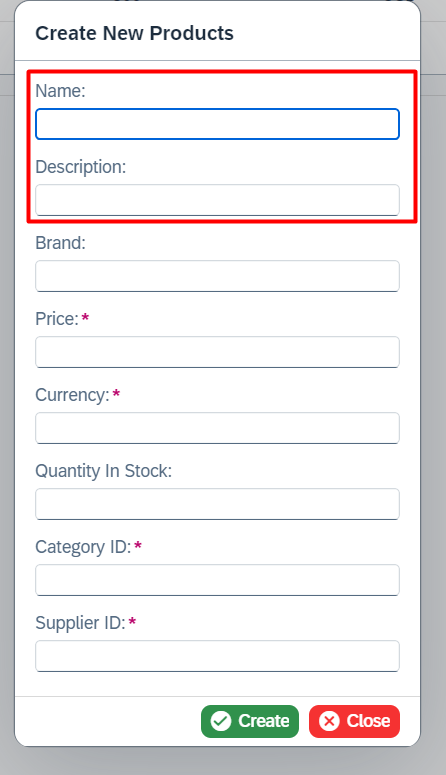
The order of the non-key properties can be modified using the setPropertyOrder() method.
| Parameter | Type | Mandatory | Description |
|---|---|---|---|
| order | string[] |
Yes | The order of the non-key properties that will be placed into the auto-generated form will be in the same order as this parameter |
| useAllProperties? | boolean |
No | If the value is set to false, only the key properties and the properties specified in the order parameter will be visible to the end user |
| Returns | Description |
|---|---|
string[] |
Returns the value that was set using setPropertyOrder() method. Default value is [] |
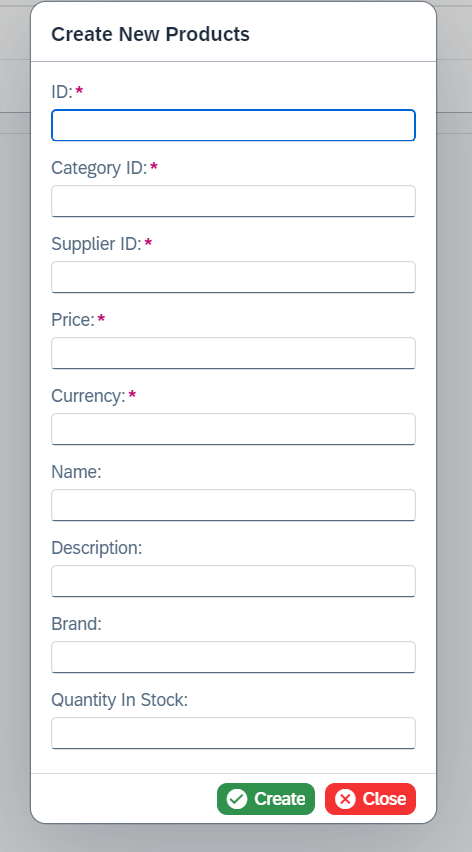
Example
Please refer to the result below, which can be found after the code blocks.
1 2 3 4 5 6 7 8 9 10 11 12 13 14 15 16 17 18 19 20 21 22 23 24 25 26 27 28 | |
1 2 3 4 5 6 7 8 9 10 11 12 13 14 15 16 17 18 19 20 21 22 23 24 25 26 27 28 29 30 31 32 33 34 35 | |
| Before | After |
|---|---|
 |
 |
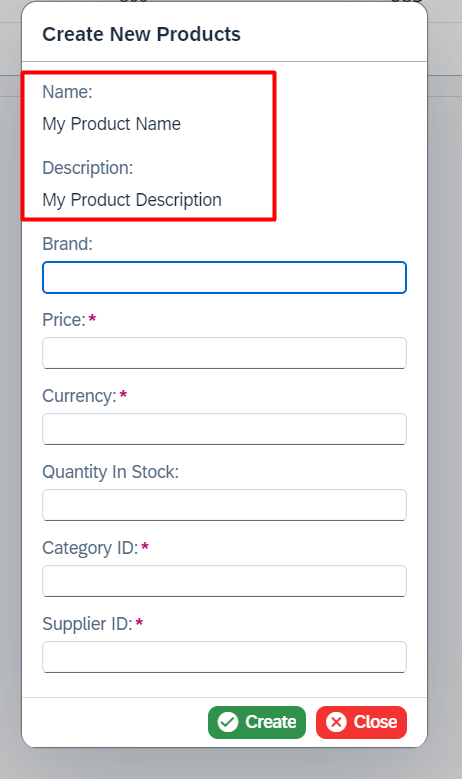
Excluded Properties
By default, all EntityType properties of the EntitySet specified in the class constructor are accessible to the end user.
To exclude properties from the auto-generated form, please utilize the setExcludedProperties() method. Please note that it is still possible to set initial values for excluded properties through the createNewEntry() method's parameter.
Attention
It is not possible to exclude any of the key properties.
| Parameter | Type | Mandatory | Description |
|---|---|---|---|
| properties | string[] |
Yes | The properties that will be excluded from the auto-generated form |
| Returns | Description |
|---|---|
string[] |
Returns the value that was set using setExcludedProperties() method. Default value is [] |
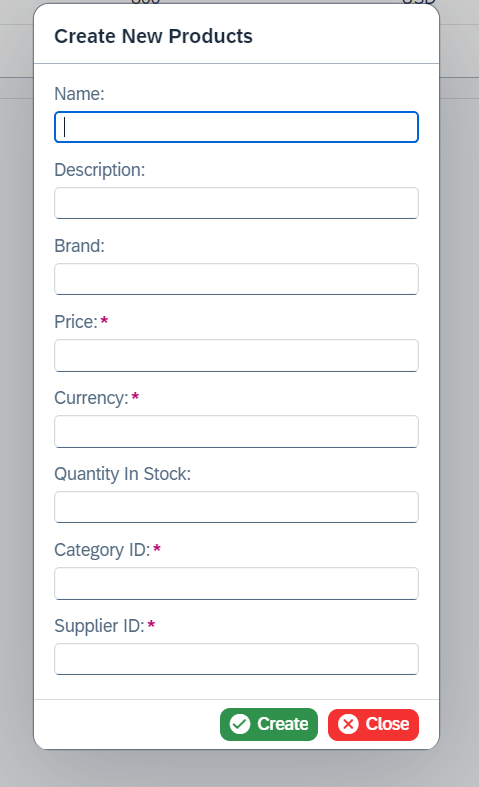
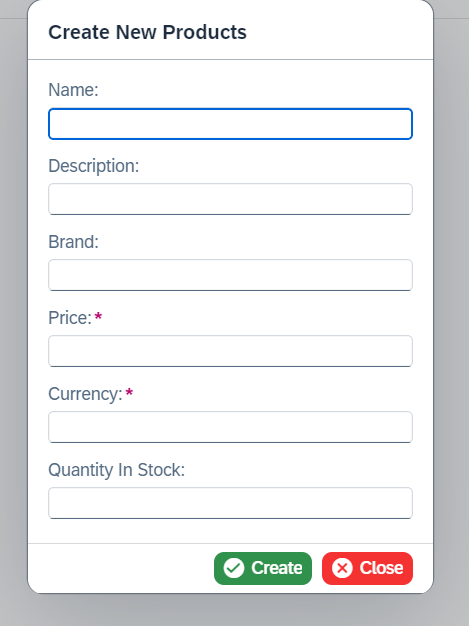
Example
Please refer to the result below, which can be found after the code blocks.
1 2 3 4 5 6 7 8 9 10 11 12 13 14 15 16 17 18 19 20 | |
1 2 3 4 5 6 7 8 9 10 11 12 13 14 15 16 17 18 19 20 21 22 23 24 25 26 | |
| Before | After |
|---|---|
 |
 |
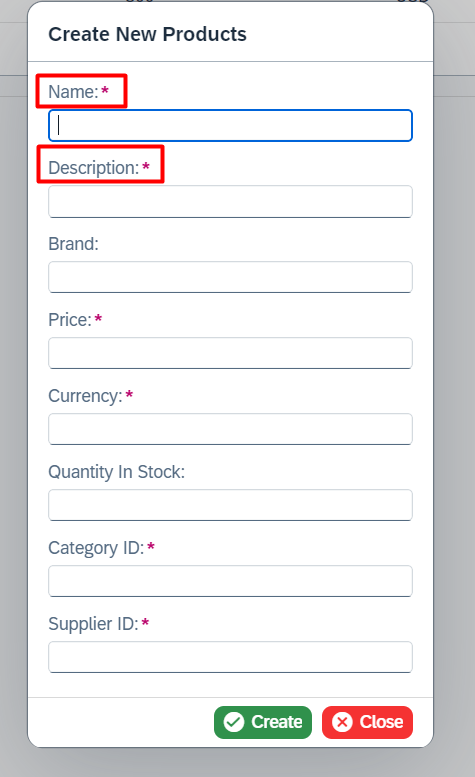
Mandatory Properties
The Entry Create class includes a built-in validation mechanism that checks the mandatory properties and applies the relevant Validation Logic before submitting the transient entity.
Info
The default setting marks all key properties and properties with the Nullable=false attribute as mandatory.
In order to include properties in the mandatory check mechanism, the setMandatoryProperties() method can be utilized.
| Parameter | Type | Mandatory | Description |
|---|---|---|---|
| properties | string[] |
Yes | The properties that will be included into the mandatory check mechanism |
| Returns | Description |
|---|---|
string[] |
Returns the value that was set using setMandatoryProperties() method. Default value is [] |
Example
Please refer to the result below, which can be found after the code blocks.
1 2 3 4 5 6 7 8 9 10 11 12 13 14 15 16 17 18 19 20 | |
1 2 3 4 5 6 7 8 9 10 11 12 13 14 15 16 17 18 19 20 21 22 23 24 25 26 | |
| Before | After |
|---|---|
 |
 |
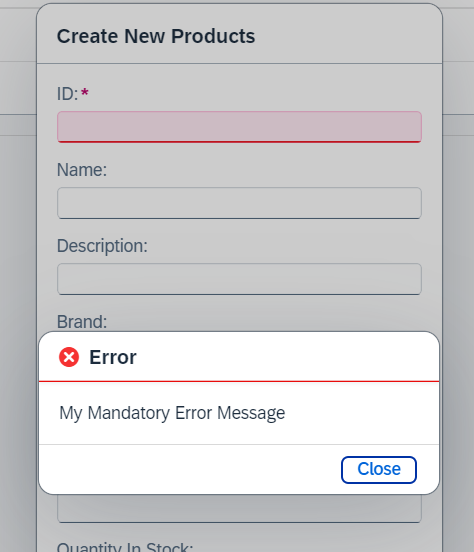
Mandatory Error Message
In the event that a property fails the mandatory check mechanism, the value state of the UI control (SmartField, Input, etc.) is set to Error, and a default message is displayed in the sap.m.MessageBox.error to the end user.
Info
Default Message: Please fill in all required fields.
To customize the default error message, please utilize the setMandatoryErrorMessage() method.
| Parameter | Type | Mandatory | Description |
|---|---|---|---|
| message | string |
Yes | The displayed message when the mandatory check mechanism fails |
| Returns | Description |
|---|---|
string |
Returns the value that was set using setMandatoryErrorMessage() method. Default value is Please fill in all required fields. |
Example
Please refer to the result below, which can be found after the code blocks.
1 2 3 4 5 6 7 8 9 10 11 12 13 14 15 16 17 18 19 20 | |
1 2 3 4 5 6 7 8 9 10 11 12 13 14 15 16 17 18 19 20 21 22 23 24 25 26 | |
Readonly Properties
In the event that the property type is Edm.Guid and the library generates a random UUID for it, the end user will be unable to edit it.
Tip
For additional details regarding properties with an Edm.Guid type, please refer to the Properties with Edm.Guid Type section.
To prevent end users from editing certain properties, the setReadonlyProperties() method can be utilized.
Info
It is possible to set the initial values for readonly properties.
| Parameter | Type | Mandatory | Description |
|---|---|---|---|
| properties | string[] |
Yes | The read-only properties |
| Returns | Description |
|---|---|
string[] |
Returns the value that was set using setReadonlyProperties() method. Default value is [] |
Example
Please refer to the result below, which can be found after the code blocks.
1 2 3 4 5 6 7 8 9 10 11 12 13 14 15 16 17 18 19 20 21 22 23 | |
1 2 3 4 5 6 7 8 9 10 11 12 13 14 15 16 17 18 19 20 21 22 23 24 25 26 27 28 29 | |
Attach Submit Completed
Once the transient entity has been successfully submitted, the Entry Create class can then call a function with a specific signature. The result of the submission is then passed to the attached function.
To attach a function, attachSubmitCompleted() method can be utilized.
Setter (attachSubmitCompleted)
| Parameter | Type | Mandatory | Description |
|---|---|---|---|
| submitCompleted | (response: ResponseCL<ResponseT = object>) => void | Yes | The function that will be called after the successful submit |
| listener? | object | No | The default listener is the controller from constructor |
Example
Let us assume that once the submission is successful, you would like to receive a response and take the necessary actions.
1 2 3 4 5 6 7 8 9 10 11 12 13 14 15 16 17 18 19 20 21 22 23 24 25 26 27 28 29 30 31 32 33 34 35 36 37 38 39 40 41 42 43 44 45 46 | |
1 2 3 4 5 6 7 8 9 10 11 12 13 14 15 16 17 18 19 20 21 22 23 24 25 26 27 28 29 30 31 32 33 34 35 36 37 38 39 | |
Attach Submit Failed
In the event that the submission of the transient entity is unsuccessful, the Entry Create class can then call a function with a specific signature. The result of the submission will then be passed to the attached function for processing.
To attach a function, attachSubmitFailed() method can be utilized.
Setter (attachSubmitFailed)
| Parameter | Type | Mandatory | Description |
|---|---|---|---|
| submitFailed | (response: ResponseCL<ISubmitResponse>) => void | Yes | The function that will be called after the submission fails |
| listener? | object | No | The default listener is the controller from constructor |
Example
Let us assume that once the submission is unsuccessful, you would like to receive a response and take the necessary actions.
1 2 3 4 5 6 7 8 9 10 11 12 13 14 15 16 17 18 19 20 21 22 23 24 25 26 27 28 29 30 31 32 33 34 35 36 37 38 39 40 41 42 43 44 45 46 47 48 | |
1 2 3 4 5 6 7 8 9 10 11 12 13 14 15 16 17 18 19 20 21 22 23 24 25 26 27 28 29 30 31 32 33 34 35 36 37 38 39 40 | |
Response Class
Once the transient entity has been submitted, the generic ResponseCL<ResponseT = object> object is instantiated and passed to the functions attached using the attachSubmitCompleted() or attachSubmitFailed() methods.
Once the submit has been completed, the class has two public methods that can be used to retrieve information. The return type of the getResponse() method is dependent on the response type (success or failure).
| Returns | Description |
|---|---|
ResponseT | object | undefined |
Returns the data that was submitted successfully through the OData V2 Model. |
| Returns | Description |
|---|---|
object |
|
statusCode?: string | undefined |
The status code of the HTTP request. |
body?: string | undefined |
The HTTP response body. |
statusText?: string | undefined |
The HTTP status text. |
headers?: object | undefined |
The HTTP response headers. |
Submit Completed and Failed (getStatusCode)
| Returns | Description |
|---|---|
string | undefined |
Returns the status code of the HTTP request. |
Validation Logic
The UI5 Antares classes include a built-in validation mechanism to guarantee that the input provided by the end user is accurate and complete before submission through the OData V2 model.
In the event of a validation failure, the end user is promptly informed via an sap.m.MessageBox.error message, and the submission remains in a pending status until the validation process is successfully completed.
There are two possible approaches to user input validation.
2) Validation with Validator Function
Constructor
In order to utilise the ValidationLogicCL class, it is necessary to initialise an object from this class.
| Parameter | Type | Mandatory | Default Value | Description |
|---|---|---|---|---|
| settings | object |
Yes | ||
| propertyName | string |
Yes | This is the property of the EntitySet that is set in the constructor for which the validation will be performed. |
|
| validator? | (value: ValidatorValueParameter) => boolean |
No | The validator function | |
| listener? | object |
No | The object that is bind to the validator function | |
| value1? | string | number | Date | UI5 Date |
No | First value to use with the given operator | |
| value2? | string | number | Date | UI5 Date |
No | Second value to use with the given operator, used only for the BT and NB operators | |
| operator? | ValidationOperator | No | Operator used for the validation | |
| message? | string |
No | Validation failed for propertyName |
The message that is displayed when the validation is unsuccessful |
| showMessageBox? | boolean |
No | true | Indicates whether the message box should be displayed by the end user |
| invalidValueMessage? | string |
No | Invalid value for propertyName |
Displayed message when the end user types in an invalid value. For instance: string to a number field |
Validation with Operator
In the event that particular values are required for user input validation purposes, these can be defined within the constructor function.
Tip
Please note that the type of the value1 and value2 parameters must align with the type of the property undergoing validation.
As an example, when the property type is Edm.DateTime or Edm.DateTimeOffset, then the data type of the value1 and value2 must be either JavaScript Date or UI5 Date.
Example
Let us consider an EntitySet named Products with the following properties: ID, name, description, price, and currency. We wish to implement a logic that allows the price to be between 1500 and 2500, and that the currency is limited to EUR.
1 2 3 4 5 6 7 8 9 10 11 12 13 14 15 16 17 18 19 20 21 22 23 24 25 26 27 28 29 30 31 32 33 34 35 36 37 38 39 40 41 42 43 44 45 46 47 48 49 50 51 52 53 54 55 | |
1 2 3 4 5 6 7 8 9 10 11 12 13 14 15 16 17 18 19 20 21 22 23 24 25 26 27 28 29 30 31 32 33 34 35 36 37 38 39 40 41 42 43 44 45 46 47 48 49 50 51 52 | |
| Validation Failed | Invalid Value |
|---|---|
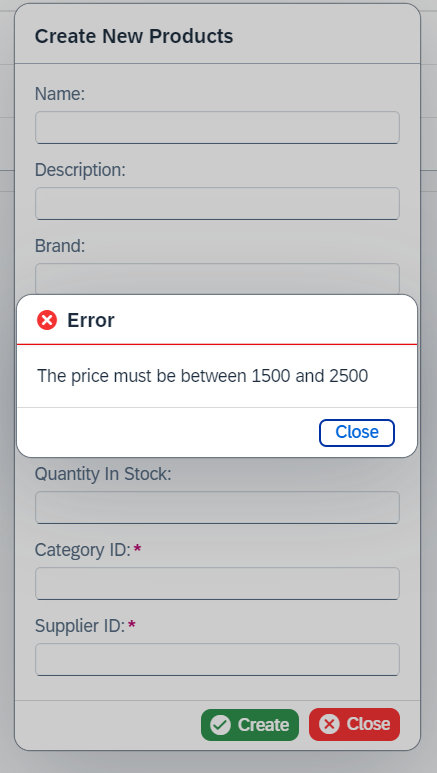 |
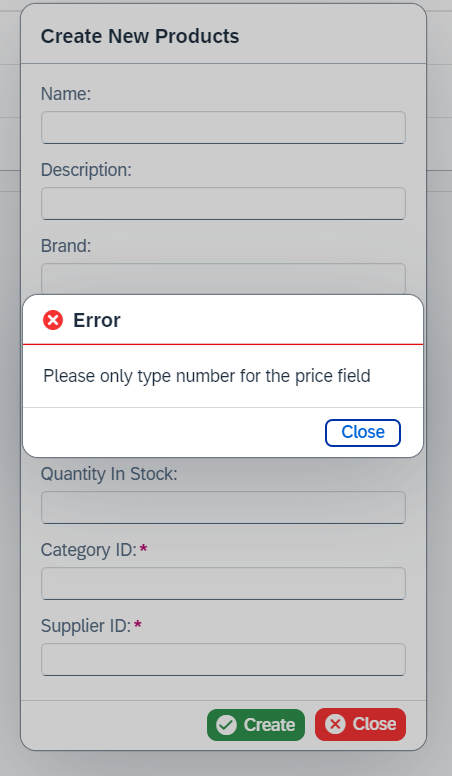 |
Validation with Validator Function
In the event that the validation logic is more complex than a simple check of specific values, it is possible to use a custom function for the purpose of validation.
It is essential that the function used for validation includes a parameter to retrieve the value entered by the end user. The UI5 Antares library transfers the user input or the custom control to the validator function as a parameter.
Info
-
The value passed to the validator function can be any one of the following types: string, number, boolean, JavaScript Date, UI5 Date, or UI5 Control.
-
If the validator function is utilized for the purpose of validating a Custom Control, the type of the parameter will be the UI5 Control that is added. To illustrate, if a sap.m.ComboBox is added as a custom control, the sap.m.ComboBox will be passed back to the validator function.
-
Please note that for auto-generated form elements, the value can only be one of the following types: string, number, boolean, JavaScript Date, or UI5 Date.
The validator function must return a boolean value indicating whether the validation was successful or not.
| Return Value | Description |
|---|---|
true |
Validation is successful |
false |
Validation is not successful |
Example
1 2 3 4 5 6 7 8 9 10 11 12 13 14 15 16 17 18 19 20 21 22 23 24 25 26 27 28 29 30 31 32 33 34 35 36 37 38 39 40 41 42 43 44 45 46 47 48 49 50 51 52 | |
1 2 3 4 5 6 7 8 9 10 11 12 13 14 15 16 17 18 19 20 21 22 23 24 25 26 27 28 29 30 31 32 33 34 35 36 37 38 39 40 41 42 43 44 45 | |
ValidationOperator Enum
| Name | Description |
|---|---|
| ValidationOperator.BT | Between. Boundaries are included |
| ValidationOperator.Contains | Contains. It can only be used with string type |
| ValidationOperator.EndsWith | Ends with. It can only be used with string type |
| ValidationOperator.EQ | Equals |
| ValidationOperator.GE | Greater than or equals |
| ValidationOperator.GT | Greater than |
| ValidationOperator.LE | Less than or equals |
| ValidationOperator.LT | Less than |
| ValidationOperator.NB | Not between. Boundaries are included |
| ValidationOperator.NE | Not equals |
| ValidationOperator.NotContains | Not contains. It can only be used with string type |
| ValidationOperator.NotEndsWith | Not ends with. It can only be used with string type |
| ValidationOperator.NotStartsWith | Not starts with. It can only be used with string type |
| ValidationOperator.StartsWith | Starts with. It can only be used with string type |
Object Page
The createNewEntry() method, by default, generates a sap.m.Dialog including a Simple Form or Smart Form content, with configurations completed using the public methods. However, there may be instances where users require a larger screen, due to one or more of the reasons listed below:
- The
EntitySetmay have numerous properties, and displaying all of these in a dialog may not be user-friendly. - The custom content may not fit in the dialog.
In such cases, the UI5 Antares library has the capability to generate a sap.uxap.ObjectPageLayout instead of a sap.m.Dialog, which may be a more suitable option.
Info
All features of the dialog generation process are also available for use in the object page generation process.
The Entry classes default setting is to generate an object page with a single section containing all the properties of an EntitySet. The default title for this section is derived from the Form Title. If you wish to change the title of this section, please use the setDefaultGroupTitle() method.
Note
Please note that any custom content added via the addCustomContent() or addContentFromFragment() methods will be added to a distinct section with a default title. The default title for the custom content is Custom Contents, but this can be modified using the setCustomContentSectionTitle() method.
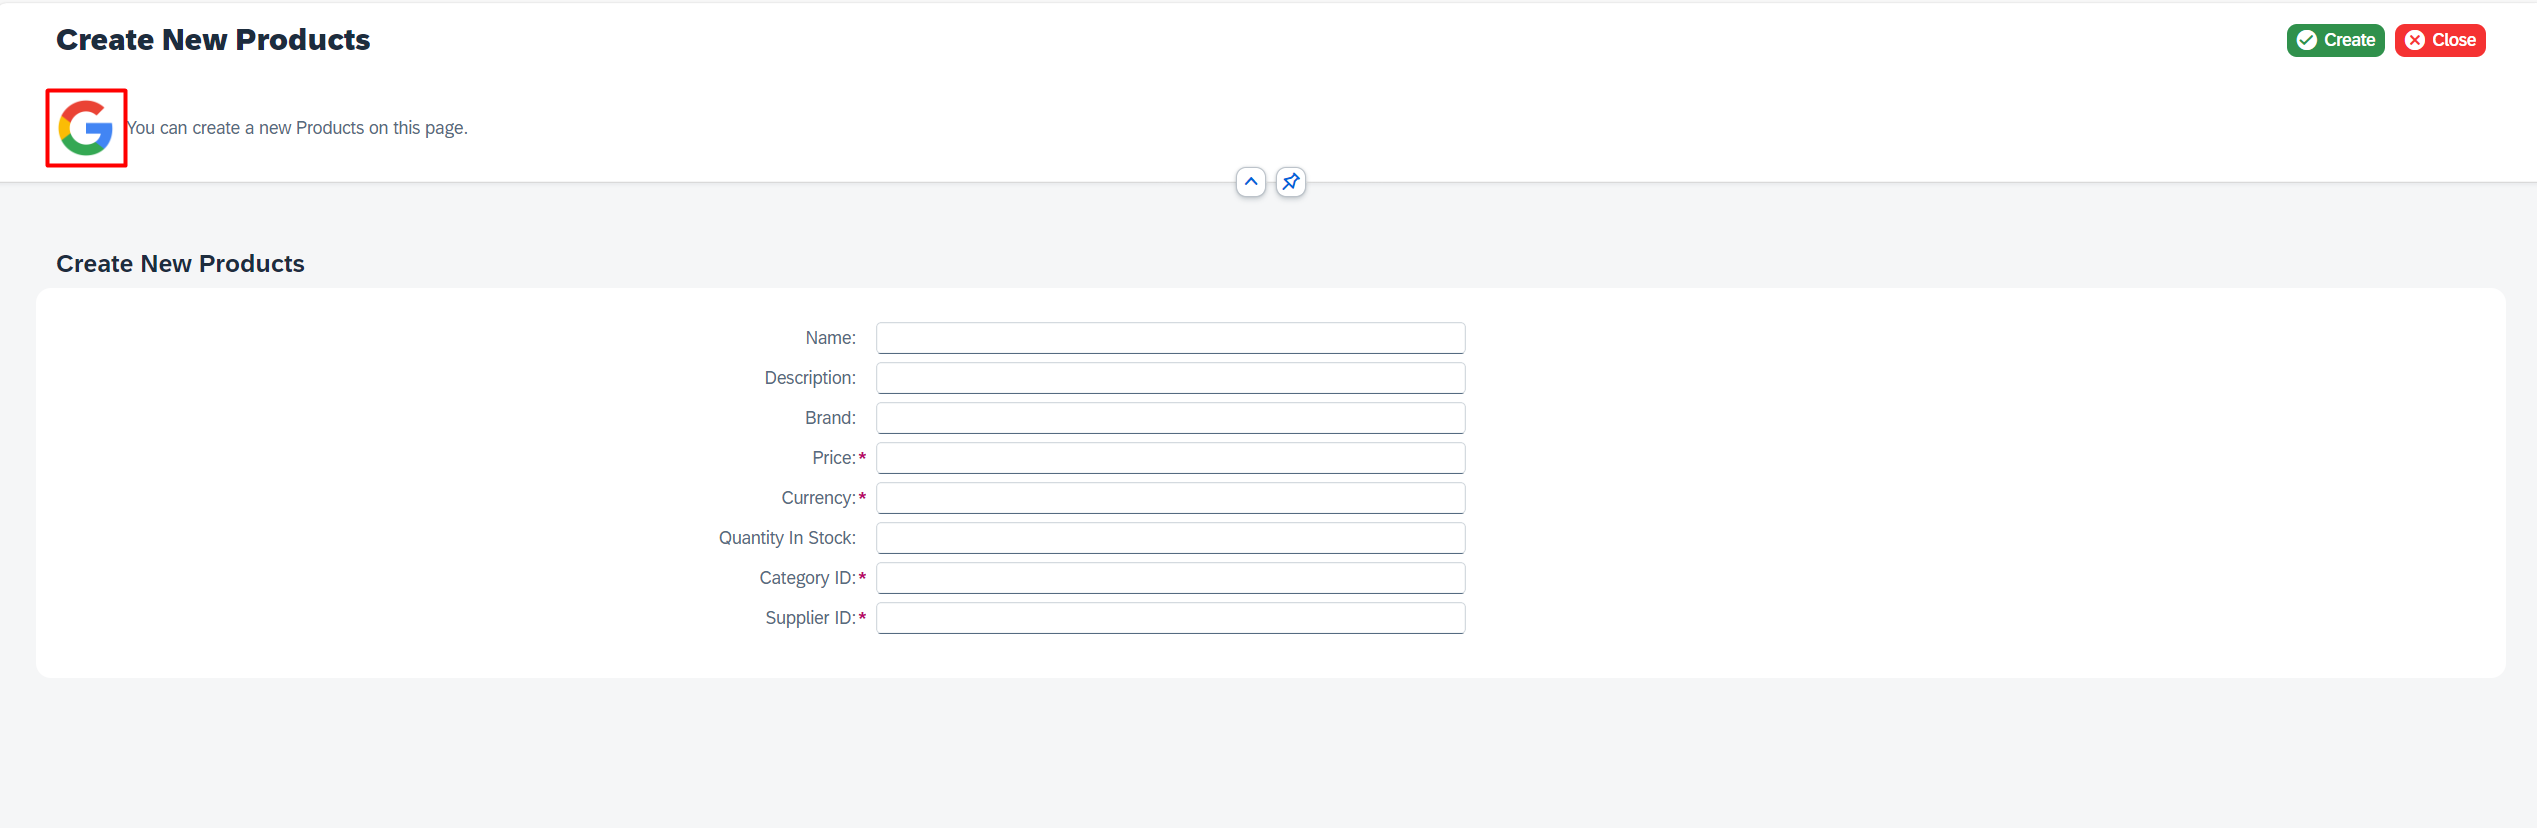
To generate an object page for the EntitySet, the setDisplayObjectPage() method can be utilized. The second parameter of this method is the target name of the current view. This information is required by the library to redirect the end user back to the view where the object page was called. The target information can be obtained from the application's manifest.json file. To find the target name of the current page, please refer to the "sap.ui5"."routing"."targets" section in the manifest.json file.
Attention
-
Please note that object page generation is only available when the SAPUI5 application has a router initialized in the UI Component (Component.js). For your convenience, the UI5 Antares library uses the router of the application and does not initialize a new router instance.
-
The UI5 Antares library does not modify the hash when displaying the generated object page. Instead, a new target, designated as UI5AntaresObjectPageTarget, is created through the application's router. This target is then displayed in real-time.
Example
Please refer to the example below, which illustrates the use of a target named MyTarget in the application's manifest.json file.
| manifest.json | |
|---|---|
1 2 3 4 5 6 7 8 9 10 11 12 13 14 15 16 17 18 19 20 21 22 23 24 25 26 27 28 29 | |
| Parameter | Type | Mandatory | Description |
|---|---|---|---|
| display | boolean |
Yes | If set to true, the library will generate an object page instead of a dialog |
| fromTarget | string |
Yes | The target name of the view to where the end user should be redirected after finishing the process on the generated object page |
| Returns | Description |
|---|---|
boolean |
Returns all the values that were set using the setDisplayObjectPage() method. Default value is false |
Example
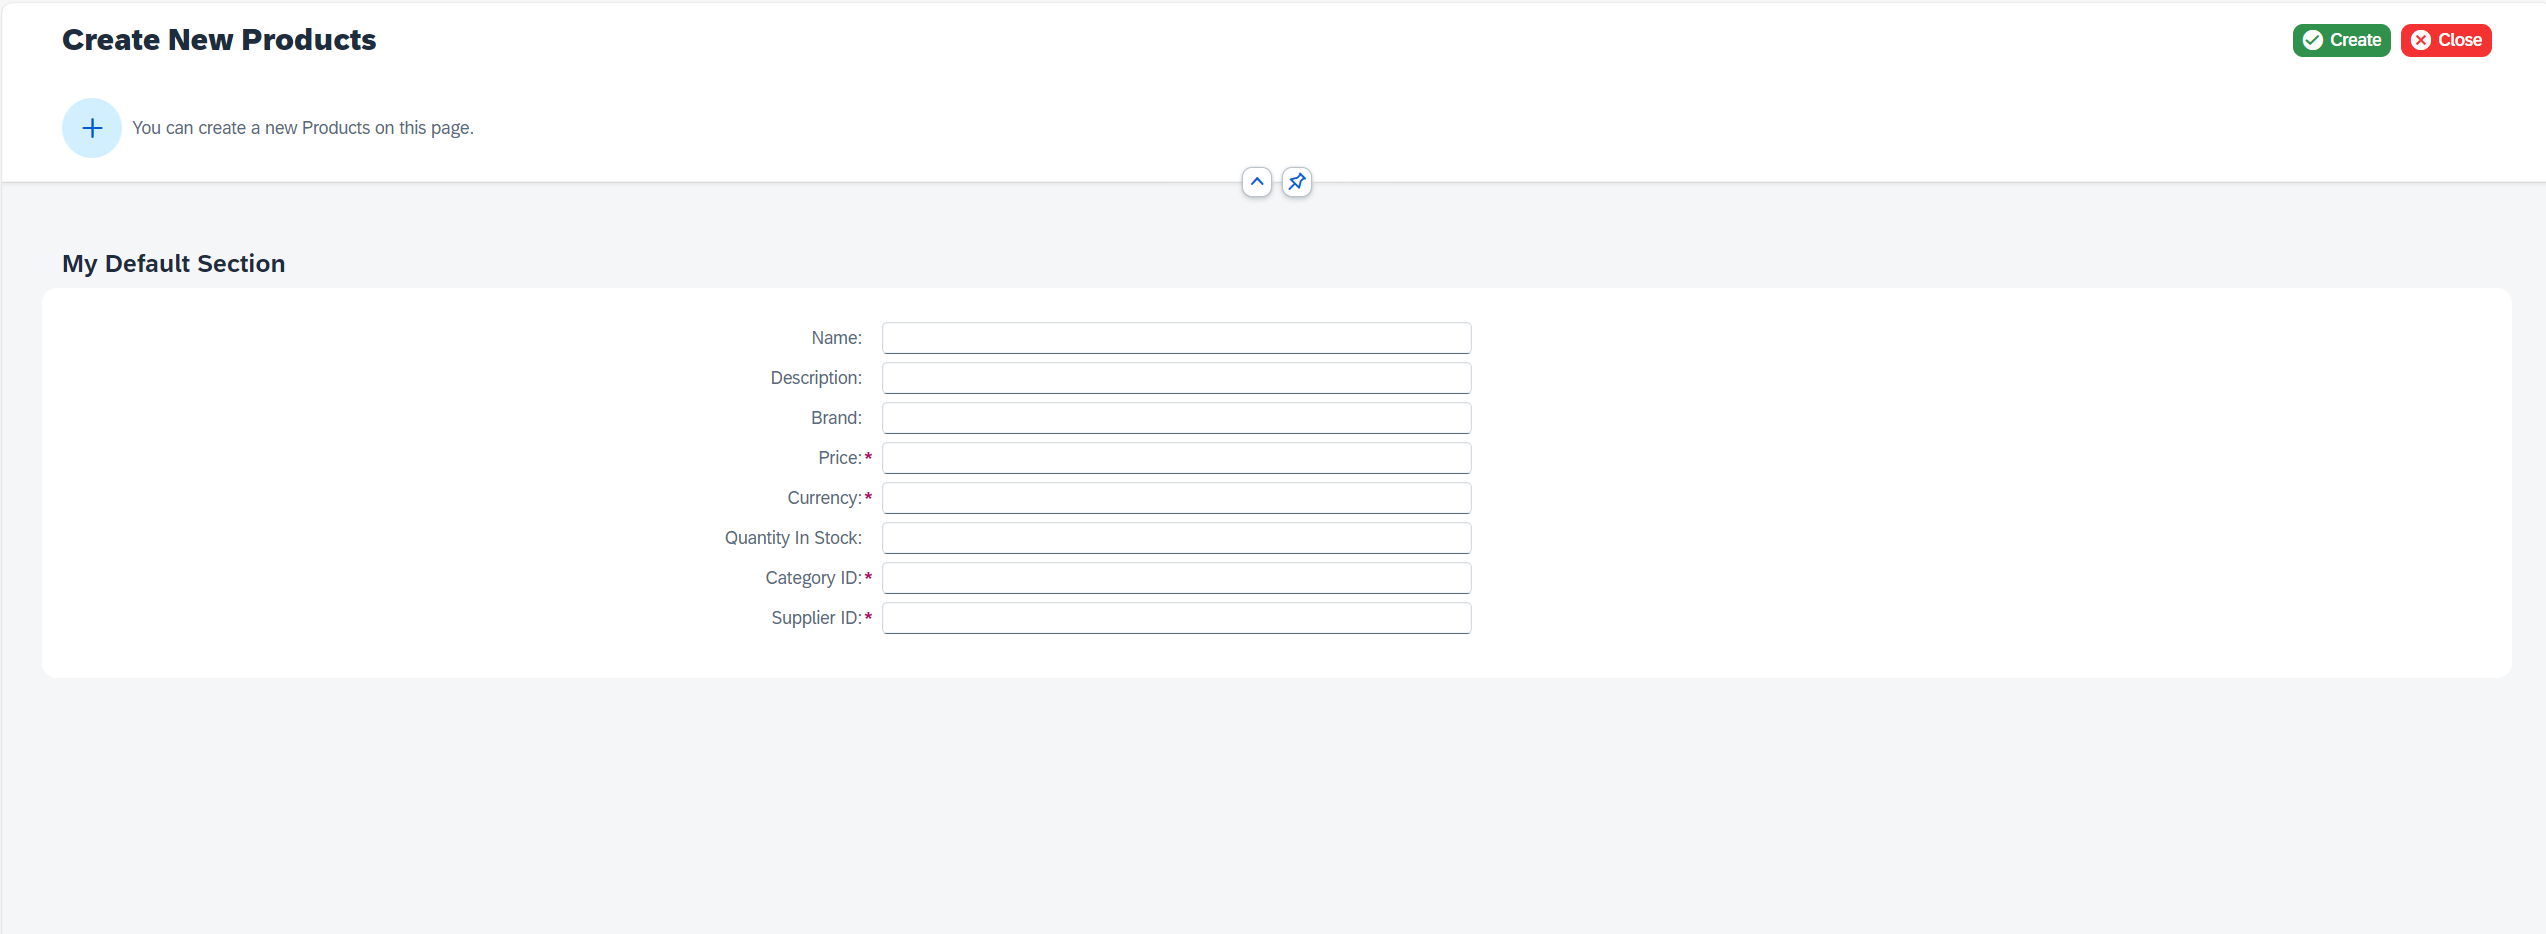
Let us consider an EntitySet named Products. Instead of using a dialog for the creation process, we would prefer to have an object page.
1 2 3 4 5 6 7 8 9 10 11 12 13 14 15 16 17 18 19 20 21 22 23 24 25 26 27 28 29 30 31 32 33 34 35 36 37 38 | |
1 2 3 4 5 6 7 8 9 10 11 12 13 14 15 16 17 18 19 20 21 22 23 24 25 26 27 28 29 30 31 32 | |
The generated object page with the default values will be similar in appearance to the following example.
Sections
To add sections to the generated object page, please utilize the Form Grouping feature.
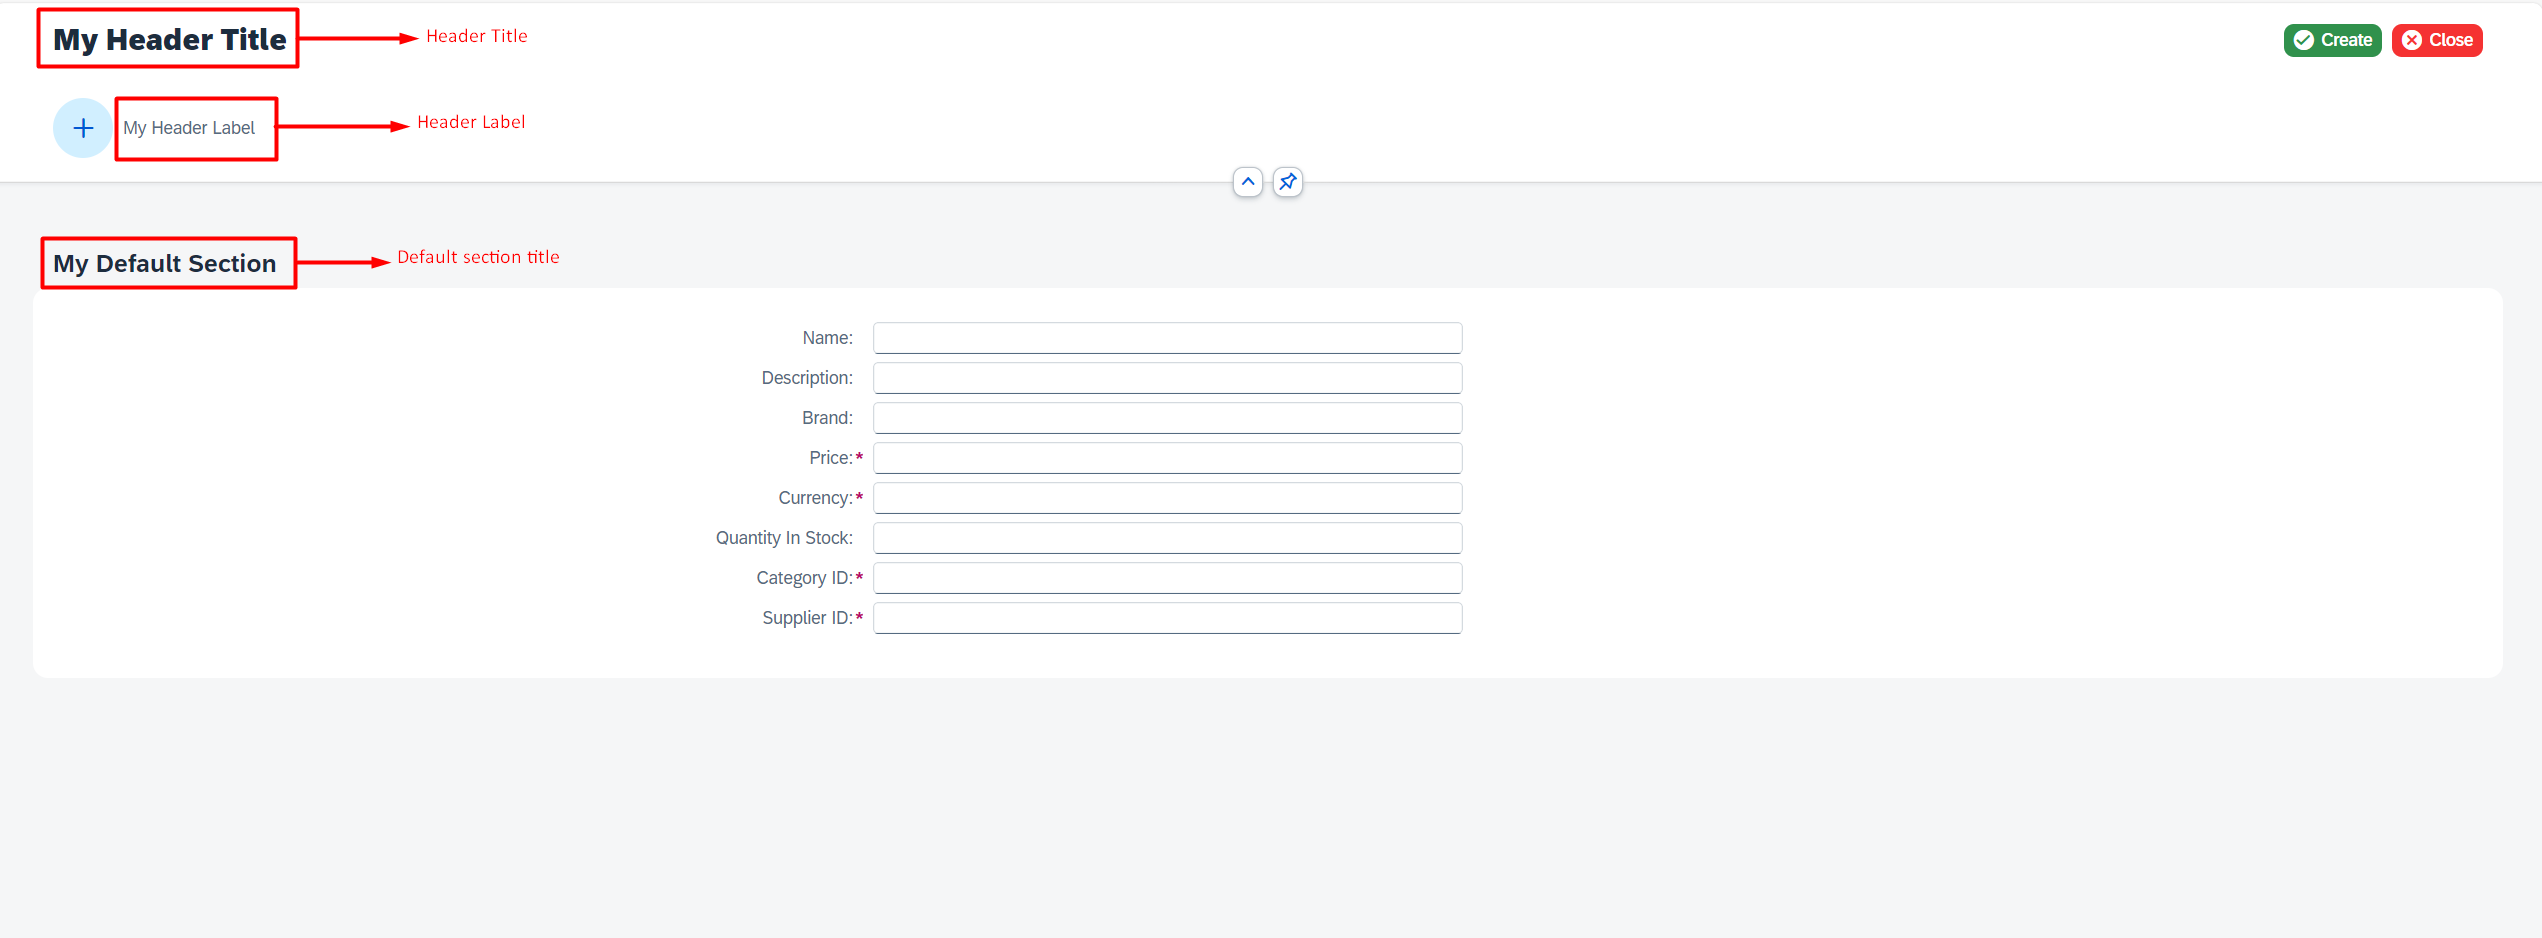
Header Title
The title in the generated object page is derived from the Form Title feature.
Header Label
The label displayed on the right side of the sap.m.Avatar can be modified using the setObjectPageHeaderLabel() method. Please find the default values for the header label below.
Default Values
| Class | Default Value |
|---|---|
| Entry Create | You can create a new ${this.entityName} on this page. |
| Entry Update | You can update ${this.entityName} on this page. |
| Entry Delete | You can delete ${this.entityName} on this page. |
| Entry Read | You can display ${this.entityName} on this page. |
| Parameter | Type | Mandatory | Description |
|---|---|---|---|
| label | string |
Yes | The label which is displayed on the right side of the sap.m.Avatar |
| Returns | Description |
|---|---|
boolean |
Returns all the values that were set using the setObjectPageHeaderLabel() method. Default value differs based on the Entry class |
Example
1 2 3 4 5 6 7 8 9 10 11 12 13 14 15 16 17 18 19 20 21 22 23 24 25 26 27 28 29 30 31 32 33 34 35 36 37 38 39 40 41 42 43 44 | |
1 2 3 4 5 6 7 8 9 10 11 12 13 14 15 16 17 18 19 20 21 22 23 24 25 26 27 28 29 30 31 32 33 34 35 36 37 38 | |
Header Avatar
To modify the src attribute of the sap.m.Avatar displayed on the object page, the setObjectPageAvatarSrc() method can be utilized. The default values for the avatar are provided below for your reference.
Default Values
| Class | Default Value |
|---|---|
| Entry Create | sap-icon://add |
| Entry Update | sap-icon://edit |
| Entry Delete | sap-icon://delete |
| Entry Read | sap-icon://display |
| Parameter | Type | Mandatory | Description |
|---|---|---|---|
| src | string |
Yes | The src attribute of the sap.m.Avatar |
| Returns | Description |
|---|---|
| string | Returns all the values that were set using the setObjectPageAvatarSrc() method. Default value differs based on the Entry class |
Example
1 2 3 4 5 6 7 8 9 10 11 12 13 14 15 16 17 18 19 20 21 22 23 24 25 26 27 28 29 30 31 32 33 34 35 | |
1 2 3 4 5 6 7 8 9 10 11 12 13 14 15 16 17 18 19 20 21 22 23 24 25 26 27 28 29 | |
Custom Content Section Title
To modify the default title for the custom content on the generated object page, the setCustomContentSectionTitle() method can be utilized.
| Parameter | Type | Mandatory | Description |
|---|---|---|---|
| title | string |
Yes | The title of the section that is generated for the custom contents |
| Returns | Description |
|---|---|
| string | Returns all the values that were set using the setCustomContentSectionTitle() method. Default value is Custom Contents |
Custom Control
By default, the UI5 Antares library creates sap.ui.comp.smartfield.SmartField when the form type is SMART or [sap.m.Input][101], [sap.m.Date The following components are generated: Picker, DateTimePicker, and CheckBox, depending on the Edm Type of the properties when the form type is Simple.
The UI5 Antares library generates the UI components shown below, depending on the Form Type.
1) SIMPLE: sap.m.Input, sap.m.DatePicker, sap.m.DateTimePicker, sap.m.CheckBox depending on the Edm.Type of the EntitySet property.
2) SMART: sap.ui.comp.smartfield.SmartField
However, you may wish to consider implementing a different UI control for the properties of your EntitySet. In such cases, the Custom Control class allows the addition of a variety of user interface controls (such as the sap.m.Slider) for the properties of the EntitySet, as defined in the constructor.
Attention
Please note that a custom control can only be added for the properties of an EntitySet specified in the constructor.
During the form generation process, the UI5 Antares library initiates a search for custom controls to be utilized for the properties of the EntitySet. In the event that no custom control is identified, the library generates a UI control based on the Form Type and Edm.Type.
Constructor
In order to utilise the CustomControlCL class, it is necessary to initialise an object from that class.
| Parameter | Type | Mandatory | Default Value | Description |
|---|---|---|---|---|
| control | Control | Yes | The UI Control to add into the auto-generated form | |
| propertyName | string |
Yes | This is the property of the EntitySet that is set in the constructor for which the custom control will be added. |
|
| validator? | ValidationLogicCL | No | The validation object |
Example
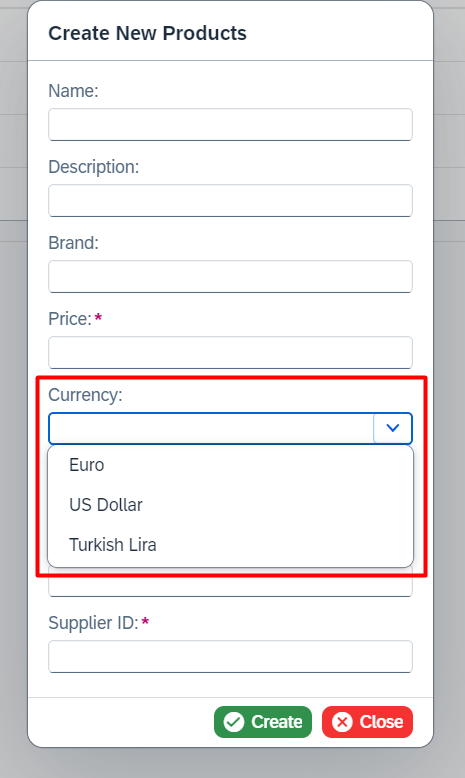
Let us consider an EntitySet named Products with the following properties: ID, name, description, price, and currency. We wish to add a sap.m.ComboBox with some predefined items for the currency property.
1 2 3 4 5 6 7 8 9 10 11 12 13 14 15 16 17 18 19 20 21 22 23 24 25 26 27 28 29 30 31 32 33 34 35 36 37 38 39 40 41 42 43 44 45 46 47 48 | |
1 2 3 4 5 6 7 8 9 10 11 12 13 14 15 16 17 18 19 20 21 22 23 24 25 26 27 28 29 30 31 32 33 34 35 36 37 38 39 40 41 42 | |
Validation
Furthermore, the custom controls can be configured to execute a Validation Logic before the transient entity is submitted.
Warning
As the addition of a custom UI control to the form is unpredictable, the library is unable to perform any validation or mandatory checks. Instead, this must be done manually using the Validator Function.
The UI5 Antares library passes the custom UI control, which has been added, as a parameter to the validator function.
Example
Let us consider an EntitySet named Products with the following properties: ID, name, description, price, and currency. We wish to add a sap.m.ComboBox with some predefined items for the currency property.
It is also important to ensure that the end user does not leave the currency field blank and that they make a selection in this field.
1 2 3 4 5 6 7 8 9 10 11 12 13 14 15 16 17 18 19 20 21 22 23 24 25 26 27 28 29 30 31 32 33 34 35 36 37 38 39 40 41 42 43 44 45 46 47 48 49 50 51 52 53 54 55 56 57 58 59 60 61 62 63 64 65 66 67 | |
1 2 3 4 5 6 7 8 9 10 11 12 13 14 15 16 17 18 19 20 21 22 23 24 25 26 27 28 29 30 31 32 33 34 35 36 37 38 39 40 41 42 43 44 45 46 47 48 49 50 51 52 53 54 55 56 57 58 59 60 | |
Custom Control From Fragment
As an alternative, custom controls can be added to the auto-generated form by loading the UI controls from a custom fragment created in the application files.
Tip
This approach allows for the addition of multiple controls simultaneously, eliminating the need to create UI controls in the controller. Custom controls can be organized in the .fragment.xml files
Attention
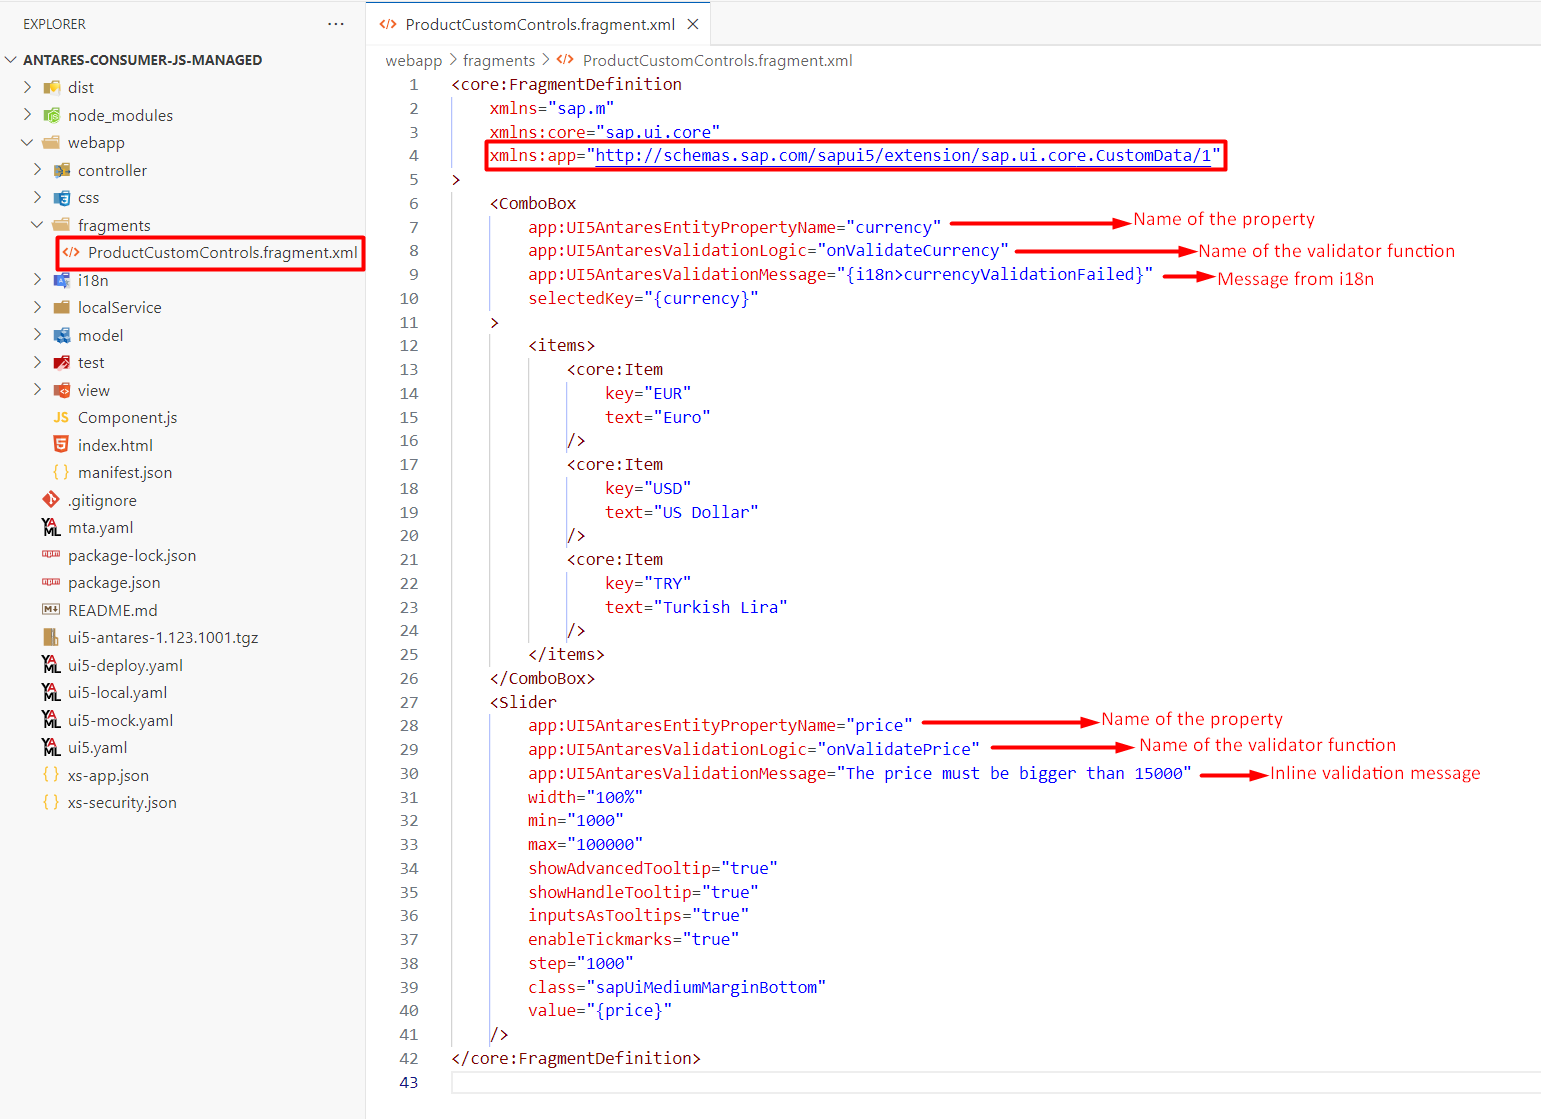
It is a requirement that a custom data with the UI5AntaresEntityPropertyName key be added to each UI control within the specified fragment. The value of the UI5AntaresEntityPropertyName key should be the property name of the EntitySet for which the custom control is added. Otherwise, the UI5 Antares library will be unable to identify for which property the UI control is being added.
Example
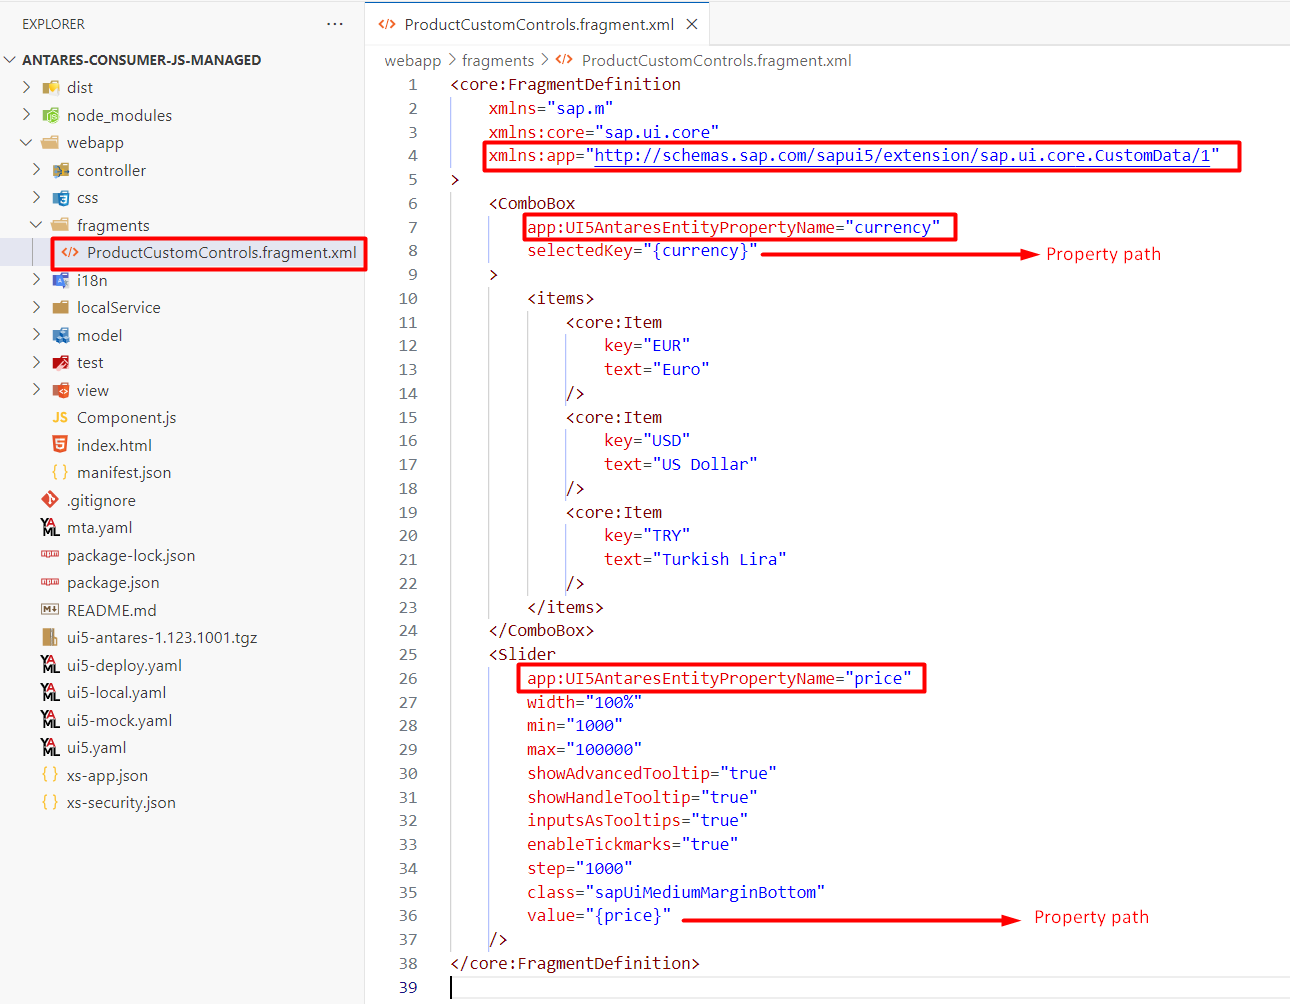
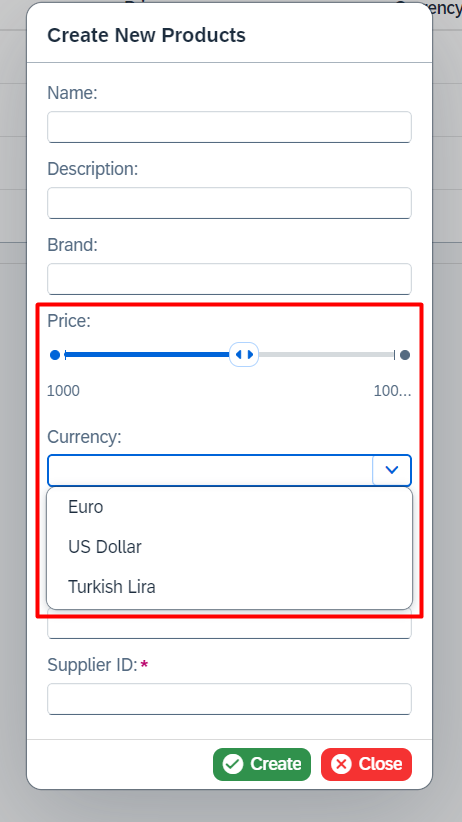
Let us consider an EntitySet named Products with the following properties: ID, name, description, price, and currency. We wish to add a sap.m.ComboBox with some predefined items for the currency property and a sap.m.Slider for the price property.
Firstly, a file with .fragment.xml extension should be created in the application files. The UI controls will be placed into this file.
| CustomControls.fragment.xml | |
|---|---|
1 2 3 4 5 6 7 8 9 10 11 12 13 14 15 16 17 18 19 20 21 22 23 24 25 26 27 28 29 30 31 32 33 34 35 36 37 38 | |
Secondly, an object from the FragmentCL should be instantiated with the controller and fragment path parameters.
Attention
Please be aware that the addControlFromFragment() method is asynchronous and must be awaited.
1 2 3 4 5 6 7 8 9 10 11 12 13 14 15 16 17 18 19 20 21 22 23 24 25 26 27 28 29 30 31 32 33 34 35 36 | |
1 2 3 4 5 6 7 8 9 10 11 12 13 14 15 16 17 18 19 20 21 22 23 24 25 26 27 28 29 30 | |
Validation
Furthermore, the custom controls loaded from a fragment can be configured to execute a Validation Logic before the transient entity is submitted.
Warning
As the addition of a custom UI control to the form is unpredictable, the library is unable to perform any validation or mandatory checks. Instead, this must be done manually using the Validator Function.
The UI5 Antares library passes the custom UI control, which has been added, as a parameter to the validator function.
Attention
It is a requirement that a custom data with the UI5AntaresValidationLogic key be added to each UI control within the specified fragment. The value of the UI5AntaresValidationLogic key should be the name of the validator function in the controller.
Tip
The default message displayed by the end user when the validation is unsuccessful can be modified by setting a custom data with the key UI5AntaresValidationMessage. The value of the UI5AntaresValidationMessage can be either the message itself or the i18n binding.
Example
Let us consider an EntitySet named Products with the following properties: ID, name, description, price, and currency. We wish to add a sap.m.ComboBox with some predefined items for the currency property and a sap.m.Slider for the price property.
We also would like to add validation and validation messages to the custom controls.
Firstly, a file with .fragment.xml extension should be created in the application files. The UI controls will be placed into this file.
| CustomControls.fragment.xml | |
|---|---|
1 2 3 4 5 6 7 8 9 10 11 12 13 14 15 16 17 18 19 20 21 22 23 24 25 26 27 28 29 30 31 32 33 34 35 36 37 38 39 40 41 42 | |
Secondly, an object from the FragmentCL should be instantiated with the controller and fragment path parameters.
Attention
Please be aware that the addControlFromFragment() method is asynchronous and must be awaited.
1 2 3 4 5 6 7 8 9 10 11 12 13 14 15 16 17 18 19 20 21 22 23 24 25 26 27 28 29 30 31 32 33 34 35 36 37 38 39 40 41 42 43 44 45 46 47 48 49 50 51 52 53 54 55 56 57 | |
1 2 3 4 5 6 7 8 9 10 11 12 13 14 15 16 17 18 19 20 21 22 23 24 25 26 27 28 29 30 31 32 33 34 35 36 37 38 39 40 41 42 43 44 45 46 47 48 | |
Custom Content
It is possible to add any UI control to the dialog below the auto-generated form.
Info
It should be noted that there is a distinction between a Custom Control and Custom Content. A Custom Control can only be added for the properties of the EntitySet specified in the constructor, whereas a custom content is a UI control that is required on the dialog but is not included in the transient entity.
Attention
Please be advised that custom content is not included in the Validation Logic process. The UI5 Antares is designed solely for the addition of custom content to the dialog. However, it is important to note that the custom content must be managed manually.
Example
To illustrate, a custom content could be a sap.m.Image, a sap.m.upload.UploadSet, or any other UI control that is necessary for the functionality of the dialog.
To add a custom content to the dialog, the addCustomContent() method can be utilized.
Example
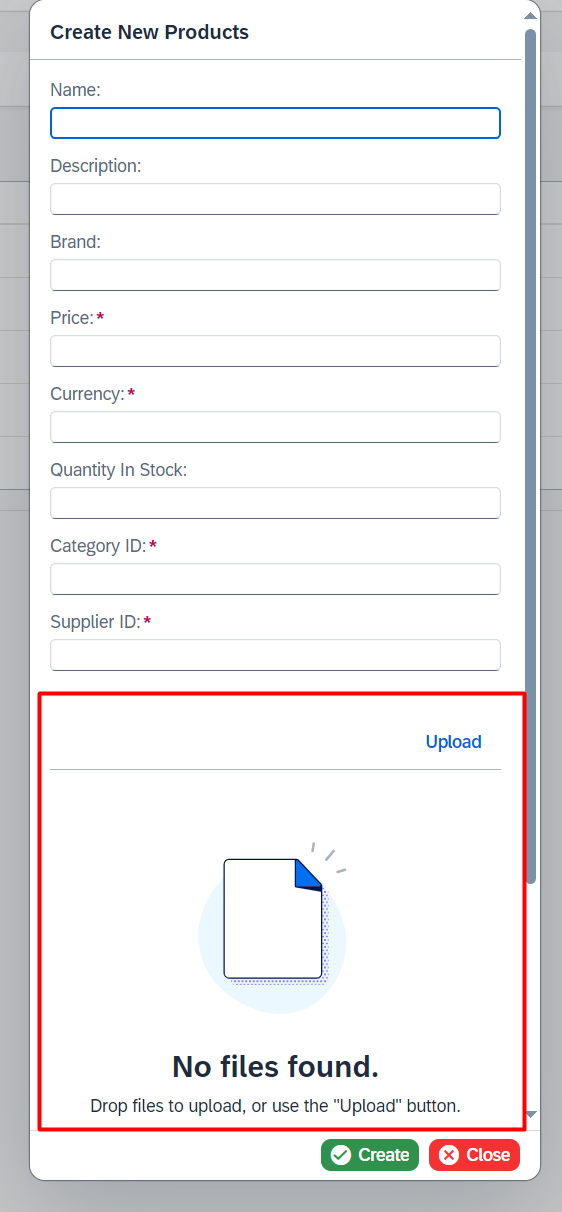
Let us consider an EntitySet named Products and we wish to add an sap.m.upload.UploadSet to the dialog that the UI5 Antares will generate.
1 2 3 4 5 6 7 8 9 10 11 12 13 14 15 16 17 18 19 20 21 22 23 24 25 | |
1 2 3 4 5 6 7 8 9 10 11 12 13 14 15 16 17 18 19 20 21 22 23 24 25 26 27 28 29 30 31 | |
Custom Content From Fragment
As an alternative method, you can also add custom content to the dialog by loading the UI controls from a custom fragment created in your application files.
Tip
This approach allows for the addition of multiple contents simultaneously, eliminating the need to create UI controls in the controller. Custom contents can be organized in the .fragment.xml files
Example
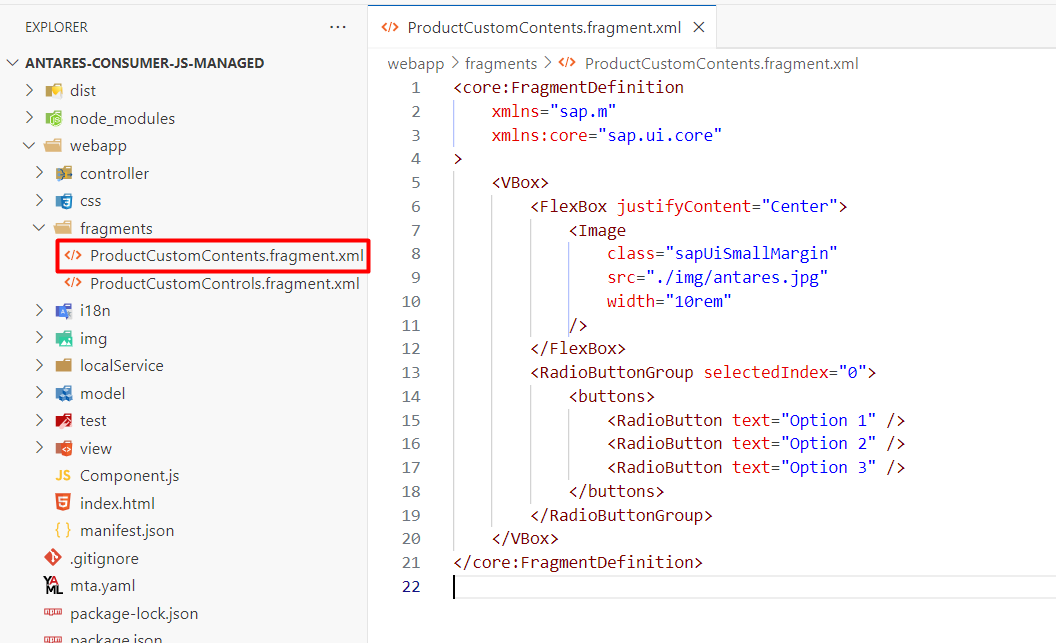
Let us consider an EntitySet named Products and we wish to add an sap.m.Image and an sap.m.RadioButtonGroup loaded from a fragment to the dialog that UI5 Antares will generate.
Firstly, a file with .fragment.xml extension should be created in the application files. The UI controls will be placed into this file.
<core:FragmentDefinition
    xmlns="sap.m"
    xmlns:core="sap.ui.core"
>
    <VBox>
        <FlexBox justifyContent="Center">
            <Image
                class="sapUiSmallMargin"
                src="./img/antares.jpg"
                width="10rem"
            />
        </FlexBox>
        <RadioButtonGroup selectedIndex="0">
            <buttons>
                <RadioButton text="Option 1" />
                <RadioButton text="Option 2" />
                <RadioButton text="Option 3" />
            </buttons>
        </RadioButtonGroup>
    </VBox>
</core:FragmentDefinition>
Secondly, an object from the FragmentCL should be instantiated with the controller and fragment path parameters.
Attention
Please be aware that the addContentFromFragment() method is asynchronous and must be awaited.
1 2 3 4 5 6 7 8 9 10 11 12 13 14 15 16 17 18 19 20 21 22 23 24 25 26 27 28 29 30 31 32 33 34 35 36 | |
1 2 3 4 5 6 7 8 9 10 11 12 13 14 15 16 17 18 19 20 21 22 23 24 25 26 27 28 29 30 | |

Custom Fragment
If you do not wish to use the library-generated form and content, an alternative option is to use your own fragment and dialog with any desired content. The UI5 Antares library will create a transient entity and open the dialog loaded from your fragment. Additionally, the transient entity will be bound to the dialog.
Attention
Please note that certain features of the UI5 Antares library are only accessible when the dialog generation is handled by the library itself. If you wish to utilise a custom fragment, you will be required to perform certain steps manually.
1) The Entry Create and Entry Update classes provide a public method named submit(), which must be called manually in order to submit the transient entity.
2) In the event that a transient entity should not be submitted and the dialog should be closed and destroyed, the reset() method, which is provided by the Entry classes, must be called.
Tip
The submit(resetAllOnFail:boolean = false) method accepts an optional parameter with a default value of false. This parameter indicates whether all transient entities in the OData V2 Model should be reset or only the current context. If you wish to reset all transient entities, please set this parameter to true. If you only wish to reset the current transient entity, there is no need to set this parameter.
Tip
Please be advised that the fragment to be loaded must contain a sap.m.Dialog and that all UI controls must be placed as the content of the dialog.
Attention
It should be noted that only a limited number of features of the UI5 Antares library can be utilized with a custom fragment.
Supported Features
| Feature | Description |
|---|---|
| Mandatory Properties | By default, UI5 Antares performs a mandatory check for the properties with Nullable="false" attribute and the properties defined using setMandatoryProperties() method. However, this feature can be deactived using setAutoMandatoryCheck() method |
| Mandatory Error Message | The default message that is displayed when the mandatory check is unsuccessful can be modified |
| Attach Submit Completed | It is possible to create a function that will be called after the transient entity has been submitted successfully |
| Attach Submit Failed | It is possible to create a function that will be called if the transient entity submission fails |
| Properties with Edm.Guid Type | By default, UI5 Antares generates random UUID for the key properties with Edm.Guid type |
To use a custom fragment, the setFragmentPath() method can be utilized.
| Parameter | Type | Mandatory | Description |
|---|---|---|---|
| fragmentPath | string |
Yes | The path of the fragment that will be loaded by the library |
| containsSmartForm? | boolean |
No | It should be set to true if the dialog contains a Smart Form |
| Returns | Description |
|---|---|
string | undefined |
Returns the fragment path that was set using getFragmentPath() method. Default value is undefined |
Example
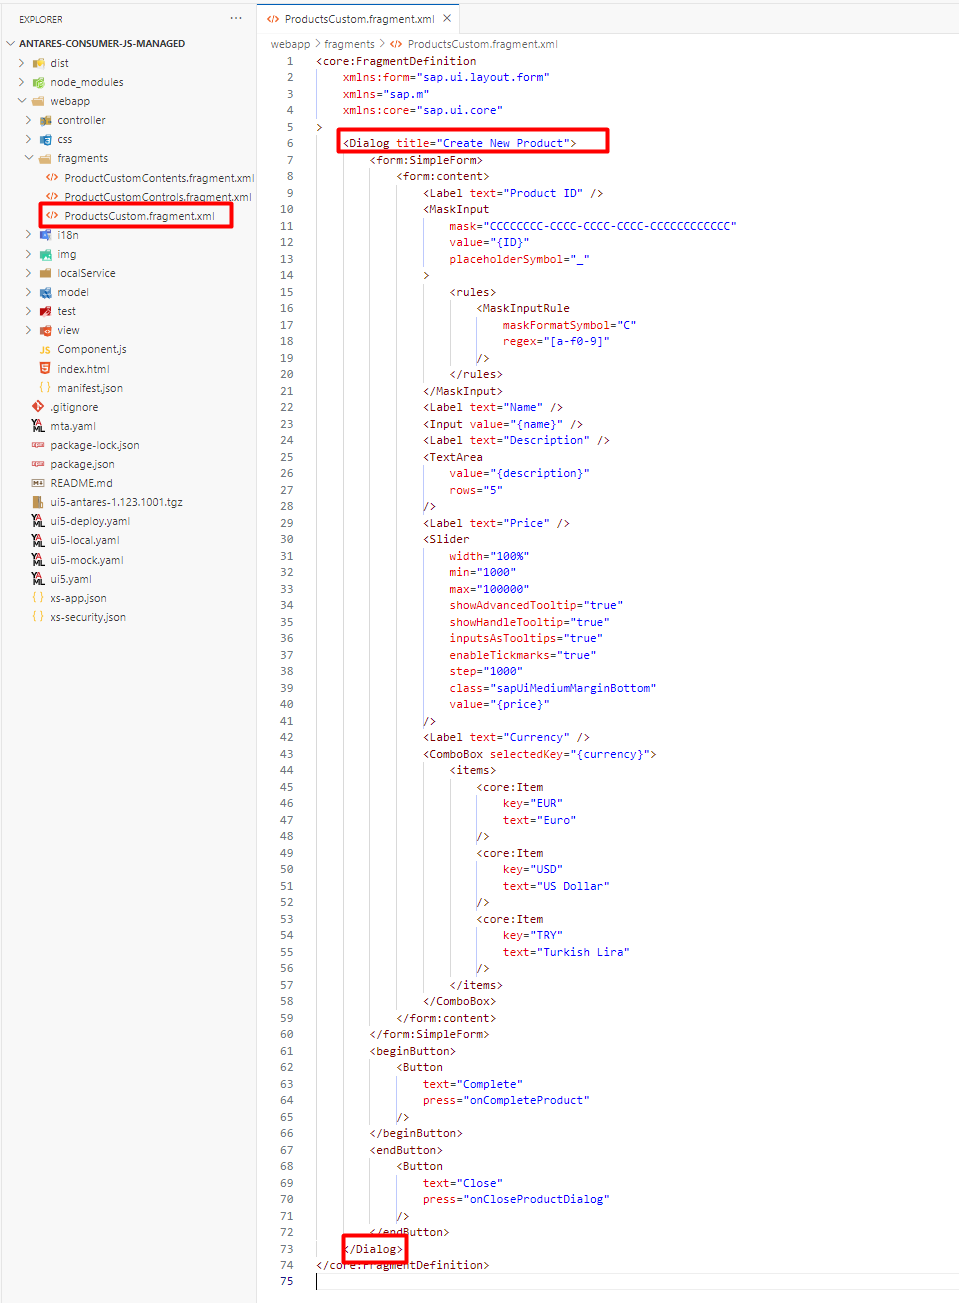
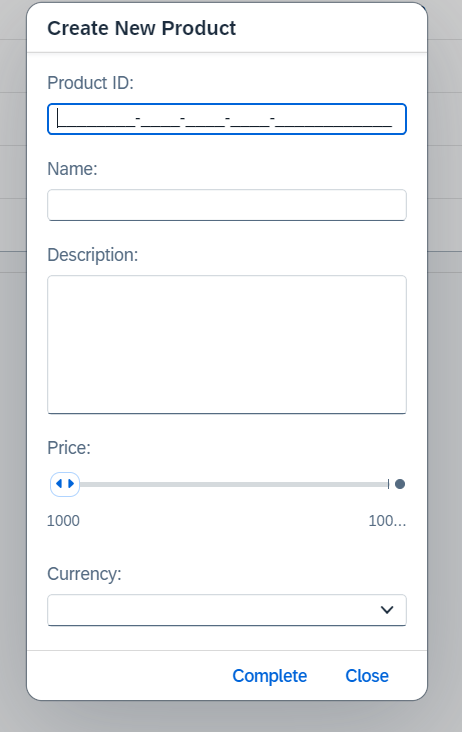
Let us assume we are working with an EntitySet called Products. Rather than having the library generate a form, our goal is to create a custom fragment.
Firstly, a file with .fragment.xml extension should be created in the application files. The UI controls will be placed into this file.
<core:FragmentDefinition
    xmlns:form="sap.ui.layout.form"
    xmlns="sap.m"
    xmlns:core="sap.ui.core"
>
    <Dialog title="Create New Product">
        <form:SimpleForm>
            <form:content>
                <Label text="Product ID" />
                <MaskInput
                    mask="CCCCCCCC-CCCC-CCCC-CCCC-CCCCCCCCCCCC"
                    value="{ID}"
                    placeholderSymbol="_"
                >
                    <rules>
                        <MaskInputRule
                            maskFormatSymbol="C"
                            regex="[a-f0-9]"
                        />
                    </rules>
                </MaskInput>
                <Label text="Name" />
                <Input value="{name}" />
                <Label text="Description" />
                <TextArea
                    value="{description}"
                    rows="5"
                />
                <Label text="Price" />
                <Slider
                    width="100%"
                    min="1000"
                    max="100000"
                    showAdvancedTooltip="true"
                    showHandleTooltip="true"
                    inputsAsTooltips="true"
                    enableTickmarks="true"
                    step="1000"
                    class="sapUiMediumMarginBottom"
                    value="{price}"
                />
                <Label text="Currency" />
                <ComboBox selectedKey="{currency}">
                    <items>
                        <core:Item
                            key="EUR"
                            text="Euro"
                        />
                        <core:Item
                            key="USD"
                            text="US Dollar"
                        />
                        <core:Item
                            key="TRY"
                            text="Turkish Lira"
                        />
                    </items>
                </ComboBox>
            </form:content>
        </form:SimpleForm>
        <beginButton>
            <Button
                text="Complete"
                press="onCompleteProduct"
            />
        </beginButton>
        <endButton>
            <Button
                text="Close"
                press="onCloseProductDialog"
            />
        </endButton>
    </Dialog>
</core:FragmentDefinition>
Secondly, an object from the Entry Create class should be instantiated with the controller and EntitySet name.
1 2 3 4 5 6 7 8 9 10 11 12 13 14 15 16 17 18 19 20 21 22 23 24 25 26 27 28 29 30 31 32 33 34 35 36 37 38 39 40 41 42 43 44 45 46 47 48 49 50 51 52 53 54 55 56 57 58 59 60 61 62 63 64 65 66 67 68 69 70 71 72 73 74 75 76 77 78 79 80 81 82 83 84 85 86 87 88 | |
1 2 3 4 5 6 7 8 9 10 11 12 13 14 15 16 17 18 19 20 21 22 23 24 25 26 27 28 29 30 31 32 33 34 35 36 37 38 39 40 41 42 43 44 45 46 47 48 49 50 51 52 53 54 55 56 57 58 59 60 61 62 63 64 65 66 67 68 69 70 71 72 73 74 75 76 77 | |
Auto Mandatory Check
The UI5 Antares library performs a mandatory check for properties with the Nullable="false" attribute and those defined using the setMandatoryProperties() method by default. However, this feature can be disabled using the setAutoMandatoryCheck() method if required.
| Parameter | Type | Mandatory | Description |
|---|---|---|---|
| autoMandatoryCheck | boolean |
Yes | If set to false, mandatory check is deactivated |
| Returns | Description |
|---|---|
boolean |
Returns the value that was set using setAutoMandatoryCheck() method. Default value is true |